![]() In this article today I will tell you what and where is the Mac task manager and how to use it.
In this article today I will tell you what and where is the Mac task manager and how to use it.
Many Mac novice users who just recently shift from Windows to iOS are confused on how to effectively manage Mac Task Manager. Mac Task Manager lets us view, manage, and end tasks, applications, and other software actively running on our Mac OS. For those who are not familiar with Mac task management, you don’t have to worry because it is not that complicated.
Activity Monitor is the equivalent name for Windows Task Manager. Whatever the lingo, it is just the same and it only refers to the same thing. In this article, we are going to learn how to effectively use our Mac Task Manager or Activity Monitor. Furthermore, we are also going to learn how does the disk activity could affect to our Mac’s performance over time.
Contents: Part 1. What Is the Mac Equivalent of Task Manager?Part 2. How to Access Activity Monitor?Part 3. Force Close Freezing Applications with Activity MonitorPart 4. Monitor Apps and Boost Mac Performance QuicklyPart 5. Conclusion
Part 1. What Is the Mac Equivalent of Task Manager?
What is Mac Task Manager?
In Windows computer, you can easily kill all the crashing app and services on your system if they all start to turn their backs on you. In Mac, there is also a Mac task manager but the name is called Activity Monitor. It works similar to the Windows task manager.

How does it work?
The entire lists of running apps on the background and those being used can be seen in the Activity Monitor. You can find and see their statuses and manage their activities. By monitoring the activity monitor of Mac you can determine its performance and can kill unresponsive apps when necessary.
Parts of an Activity Monitor
There are 5 main parts of a Mac task manager. These 5 categories are divided according to their use and processes.
- CPU Load
The CPU tab shows every processes and activity which our Mac performs. We can also see the percentage of the total CPU process and how long has it been using or running. At the bottom, there can be found a graph of the usage percentage of the CPU. The red indicates the system’s usage, while the blue indicates the user’s activity and usage.
- RAM
The Memory tab shows how much RAM our Mac has been using. At the bottom of the window, there can be found a real-time memory graph which is beneficial in assessing the device’s performance. The Memory tab will also show the total amount of memory consumed by apps as well as the remaining memory. The memory used by all apps and system processes is divided into the following:
- Wired Memory. It is where must-stay memory is processed. It cannot be compressed or page out.
- App Memory. This is where the amount of memory used by existing and running applications on the device.
- Compressed Mac has a software-based memory which is compressed in order to enhance the performance and reduce the system’s energy use.
- Energy Used
The Energy tab in our Mac Task Manager is the main resource monitor. It shows us the overall energy consumed and used up by each existing app on our device. Basically, the more energy that the app consumes, the lower the battery life or energy level becomes.
- Disk Space
The Disk tab shows the amount of data each process has read from or written to the disk. The graph which can be found at the bottom will show the number of times it has accessed to read or write. The color blue indicates the number of reads, and the color read states the number of writes per second. Basically, if the disk activity is high, it correlates to the CPU usage and the processes of other apps.
Tip: There are some useful cleaners for Mac that can help you to free up the disk space so that you can save something else important to your Mac.
- Network Monitoring
The Network tab monitors and shows how much data our device receives and sends over the network. At the bottom is the summary of the amount transferred and received. To change the default, Click View All button and proceed to All Processes.
Part 2. How to Access Activity Monitor?
You can easily find the Mac task manager in the Utility folder. There are few ways on how to access the activity monitor and here are some methods on how to do it:
Using Spotlight Search
- Open Spotlight or press the
Command + Spacebarto launch - Enter Activity Monitor
- Find the app on the search results and click to open
Via Finder
- Launch Finder
- Go to Applications
- Click Utilities
- Double-click Activity Monitor to launch the app
If you would like to keep the Activity Monitor onsight you can pin the app on the dock for future references. Here's how:
- Launch Activity Monitor (choose from the options given above)
- Right click on the app icon
- Find and Click Options
- Click Keep in Dock
You will never have to search Activity Monitor again!

Possible Issues and Problems Encountered
Once in a while, some of us experience minor issues that could ruin our day. This is acceptable. For some first-time users, encountering some of these issues may give you a slight headache. While it is painless for some, others still experience some difficulties in overcoming it. Here are some examples of possible issues and problems which we may encounter:
- Freezing or Lagging
Many would agree that once in a while, during our experience with our Mac, we had encountered such experience. Some experiences it when installing or downloading a new app on our Mac. While others have it simply by browsing around the internet. Fret not, this is a common problem and issues which can be easily solved by managing well our Mac Task Manager.
- Insufficient Space
Another issue which is true whether we are using a Mac or Windows. This happens because of the substantial amount of data, files, apps, and other more processes we have done on our Mac.
- Slower Performance
This usually happens when you upgrade or install a new app on your device. It could also be because of the amount of cache, cookies, and other unneeded files taking up on your storage. This can be done by easily visiting our Mac Task Manager or Activity Monitor and running Force Quit program.
- Network Speed
Some of us also struggle with slower network speed. It could be because of the current WiFi preferences. This can be addressed by deleting the current preference and restarting the modem or router afterward.
Part 3. Force Close Freezing Applications with Activity Monitor
Just like how you kill an acting software or application on Windows, the Activity Monitor does the same thing. Some apps do not close all by itself and leave you hanging with a freezing screen. Refer to these guides below on how to kill all the freezing running apps on your Mac.
- Open Activity Monitor
- Find the application among the lists of running apps
- Search and click on the X button on the upper left side of the app
- Click Quit on the pop-up screen that appears
- Click Force Quit if the app is still in the background to End the Process
What is Ctrl Alt Del on a Mac (Force Quit)?
A quick background on the force quit process on Mac. This is to simply end process of any freezing apps and no longer responsive. The force quit is similar to the CTRL+ALT+DELETE on Windows but only uses the keys: COMMAND +OPTION +ESCAPE
Part 4. Monitor Apps and Boost Mac Performance Quickly
We know that maintaining computers especially Mac can be tiresome and it can be dreading if you are unfamiliar with its components. When causing serious mess is your main concern that you don't want to explore and tweak some parts of the system, you can use one solution for any Mac needs.
iMyMac PowerMyMac is a the sought-after-after tool that easily explores, diagnoses and cleans unnecessary files and clogs on Macs.
iMyMac PowerMyMac does the following:
Scans the entire Mac system
Deletes Clutter and Junk Files
Determines Old and Large files no longer needed
Shreds files easily and leaves no traces for vital documents
All these can be done in just a few clicks and by only using one program. Now when you are experiencing serious freezing and crashing apps and it seems like there is more to it, you can clean them out using PowerMyMac.
It has a free download version wherein you can try and test its features. Surely you will enjoy its convenience and effectiveness at the same time. Follow these easy steps on how to de-clutter your system in no time!
Step 1. Download and Launch PowerMyMac on Your Mac
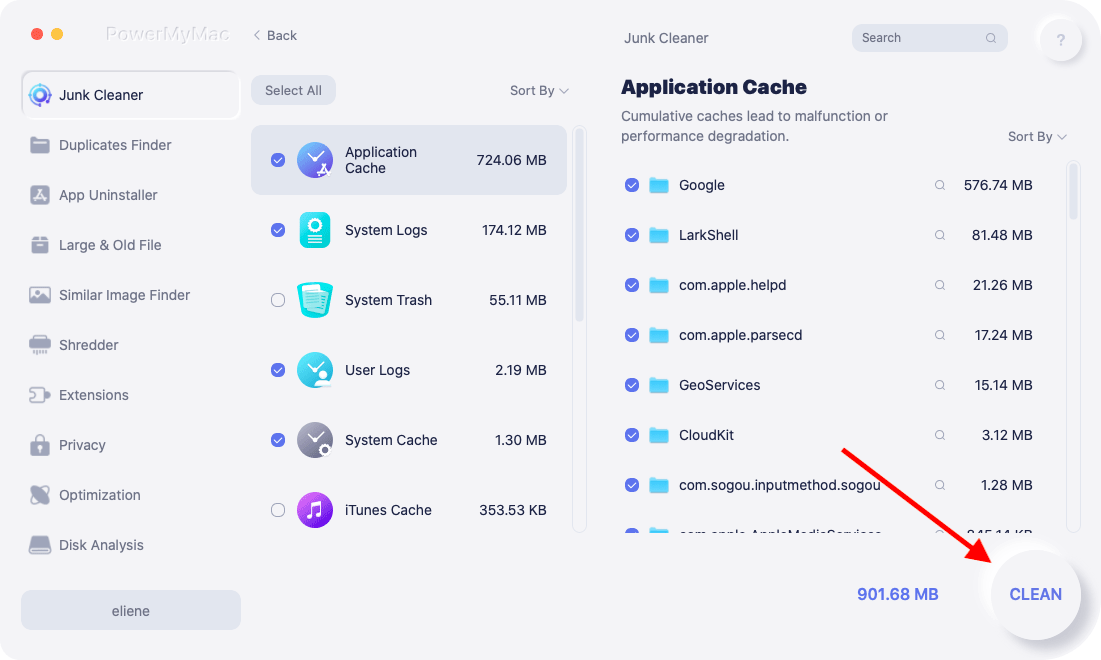
Download, install and launch PowerMyMac. Follow the onscreen prompts. Find the Junk Cleaner from the left side panel.
Step 2. Scanning System Junk
Allow the program to scan the entire Mac. This process will allow Mac to deeply find and show you the lists of Junk files. Selectively choose the Junk files among the displayed lists on the screen. These Junks are composed of Caches, Files and Photos Junk, System Logs, and more

Step 3. Review and Select Items to Clean Up
Click the CLEAN button once you are sure to clean the given lists.

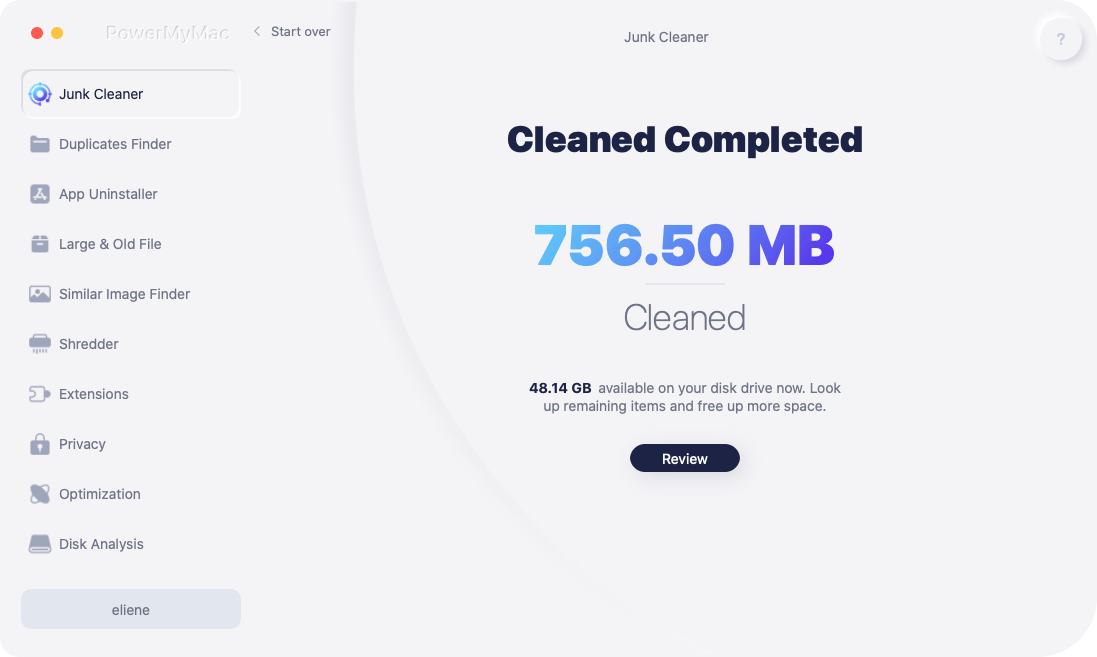
Step 4. Clean Up Mac System Junk is Done
Wait until the process is completed. After PowerMyMac has finished removing all the clutters and junks off your system, you will notice that these folders now have 0KB. This means that the folders no longer contain any caches, logs, etc.. inside.

If your web browser is the one freezing and crashing on you, you can use PowerMyMac and simply choose the Privacy or find out other Mac tools you use to speed and boost up your system!
People Also Read:What is Other on Mac Storage and Quickly Clean ThemHow to Speed Up Mac
Part 5. Conclusion
Now that you have learned about the Mac task manager, you can now conveniently check on the running apps and diagnose them from time to time. For new shifters from Window to Mac, there are various equivalents of Task Manager on Mac. Activity Monitor is one of them and it is one of the common built-in systems which is usually used by most Mac users.
However, if you are looking for easier ways to manage your apps and boost your system, PowerMyMac is highly recommended. It helps monitor your CPU, RAM, and System’s performance and status. It also helps declutter and smartly removed unnecessary apps and offers a safer way to uninstall unwanted apps. It is safe, fast, and efficient at all times plus you are confident that you are removing the right files.


