


BlackHole, the popular app for Mac, offers users a seamless and secure way to capture and record audio. However, as with any application that handles large amounts of data, it can accumulate a significant cache over time. This cache consists of temporary files, settings, and other data that BlackHole stores for quick retrieval. While the cache is designed to improve performance, it can also consume valuable disk space and potentially impact your Mac's efficiency. It is very necessary to frequently delete the app's cache on Mac to maintain peak performance and guarantee data safety.
In this article, we will explore the importance of the process to clear BlackHole cache on your Mac and the benefits it brings. We will provide step-by-step instructions on how to remove this cache effectively, helping you regain precious storage space while boosting your system's performance. Whether you're a seasoned Mac user or new to the BlackHole app, read on to discover the best practices for clearing the BlackHole cache and ensuring optimal functionality for your Mac.
Contents: Part 1. Does Clearing BlackHole Cache Affect the Transferred Audio File Quality?Part 2. Where Can I Find BlackHole Cache and Remove It from Mac?Part 3. How Do I Clear BlackHole Cache with a Reliable Cleaner? Part 4. Conclusion
Part 1. Does Clearing BlackHole Cache Affect the Transferred Audio File Quality?
BlackHole, an acclaimed audio capture app for Mac, has gained popularity among content creators, podcasters, and musicians for its ability to seamlessly route audio between applications. By creating virtual audio devices, BlackHole allows users to capture audio from various sources and redirect it to their desired destinations. As a result, users can effortlessly record podcasts, stream live performances, or enhance their audio production workflow.
However, as BlackHole operates, it generates a cache—a collection of temporary files and settings—designed to improve the app's performance and enhance audio routing efficiency. The cache helps BlackHole recall frequently used data quickly, reducing latency and ensuring smooth audio transfer.
Now, you may wonder whether clearing the BlackHole cache affects the quality of the transferred audio files. The answer is no. Clearing the cache does not impact the actual audio content or alter its quality. The cache solely consists of temporary data related to the app's functioning, such as preferences, settings, and temporary files.
Clearing the BlackHole cache primarily aims to optimize your Mac's performance and free up storage space. By removing accumulated temporary data, you can ensure that BlackHole operates at its best, maximizing system resources and preventing any potential slowdowns or conflicts.
In the next section, we will delve into the process of clearing the BlackHole cache on your Mac, providing you with a step-by-step guide to boost performance while preserving the audio quality you desire.
Part 2. Where Can I Find BlackHole Cache and Remove It from Mac?
To clear the BlackHole cache on your Mac manually, follow these simple steps:
- Quit BlackHole. Before clearing the cache, ensure that you exit the BlackHole application completely. Go to the Menu Bar, click on the BlackHole icon, and select "Quit BlackHole."
- Locate the BlackHole Cache Folder. To find the BlackHole cache folder, you'll need to access the Library directory on your Mac. Follow these steps:
- Open a new Finder window.
- Click on "Go" in the Menu Bar.
- Press and hold the "Option" key. This will reveal the "Library" option in the dropdown menu.
- Click on "Library" to open the Library folder.
- Within the Library folder, navigate to the following directory: "Containers/com.existentialaudio.blackhole.mac/Data/Library/Caches/com.existentialaudio.blackhole.mac." Here, you will find the BlackHole cache folder.
- Clear the BlackHole Cache. In the BlackHole cache folder, select all the files and folders present. You can either use the keyboard shortcut "Command + A" or manually select them. Once selected, right-click on the selected items and choose "Move to Trash" from the contextual menu. Alternatively, you can drag the selected items to the Trash bin.
- Empty the Trash. To complete the cache-clearing process, empty the Trash bin. Right-click on the Trash icon in the Dock and select "Empty Trash" from the options. Confirm the action when prompted.

Congratulations! You have successfully cleared the BlackHole cache from your Mac manually. By removing these temporary files, you have optimized the performance of the BlackHole application and freed up valuable storage space.
It's important to note that clearing the cache will not delete any audio files or recordings you have made using BlackHole. The cache solely contains temporary data related to the app's functioning and does not affect the actual audio content or its quality.
Part 3. How Do I Clear BlackHole Cache with a Reliable Cleaner?
When it comes to clearing the BlackHole cache and optimizing your Mac's performance, using a reliable cleaner tool can simplify the process and ensure thorough removal of unnecessary files. One such powerful and trustworthy cleaner is iMyMac PowerMyMac.
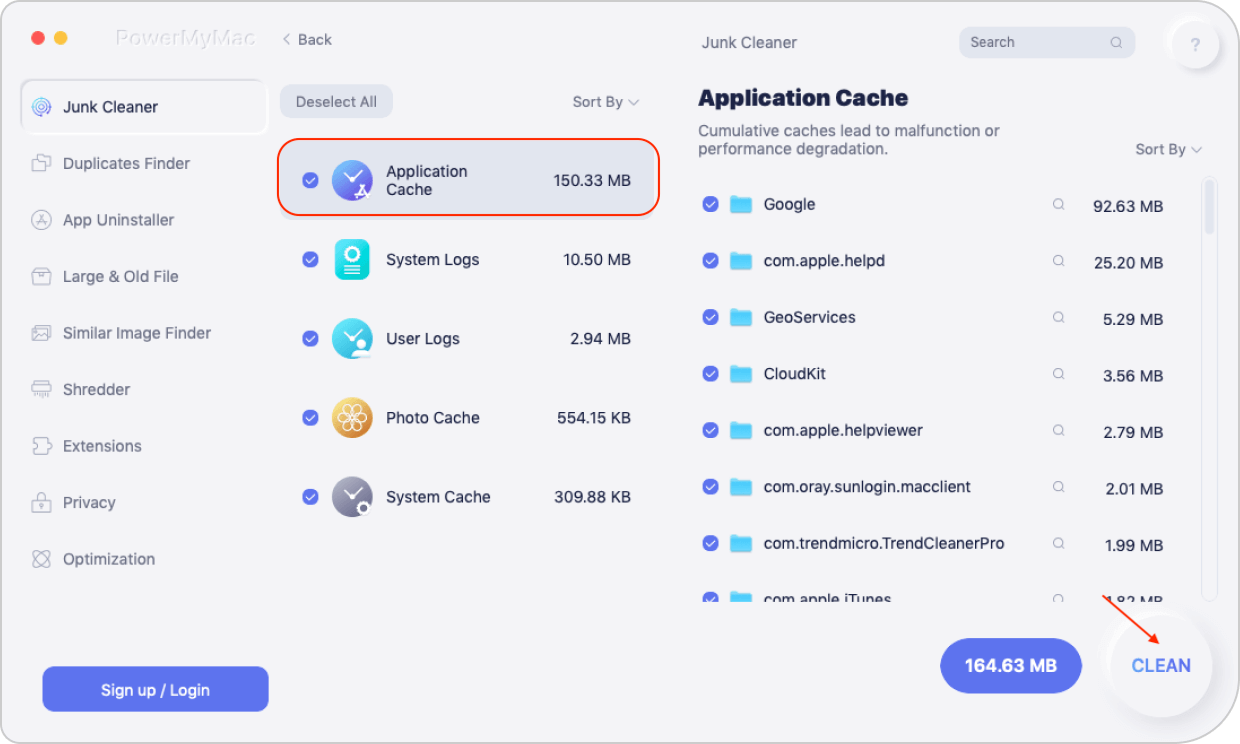
PowerMyMac is an all-in-one utility tool designed to enhance the performance of your Mac by optimizing system resources, cleaning up junk files, and providing various maintenance functions. Among its features is the "Junk Cleaner" module, which specifically targets and clears app caches, including the BlackHole cache.
Here's how you can use PowerMyMac's Junk Cleaner to clear the BlackHole cache:
- Download and Install PowerMyMac. Visit the official PowerMyMac website and download the application compatible with your Mac version. Install the software by following the on-screen instructions.
- Launch PowerMyMac. Once installed, launch PowerMyMac on your Mac. The main interface will provide an overview of your system's status.
- Access the Junk Cleaner Module. On the left sidebar of the PowerMyMac window, click on the "Junk Cleaner" tab.
- Scan Your System for Junk Files. Click on the "Scan" button to initiate the scanning process. PowerMyMac will thoroughly analyze your Mac's storage and identify the junk files, including the BlackHole cache.
- Review and Select BlackHole Cache. Once the scan is complete, PowerMyMac will present a detailed list of junk files found on your Mac. Browse through the list and locate the BlackHole cache files. You can use the search bar to quickly find them.
- Clean BlackHole Cache. Check the box next to the BlackHole cache files to select them for cleaning. Click on the "Clean" button to initiate the cleaning process. PowerMyMac will remove the selected BlackHole cache files from your Mac.
By utilizing PowerMyMac's Junk Cleaner module, you can easily and efficiently clear the BlackHole cache, along with other unnecessary junk files on your Mac. This will help optimize your system's performance, free up valuable storage space, and ensure smoother operation of the BlackHole app.
Remember to regularly use PowerMyMac or similar reliable cleaner tools to maintain a clean and optimized Mac system.
Part 4. Conclusion
In conclusion, clearing the BlackHole cache on your Mac is essential for optimizing performance and freeing up valuable storage space. Whether you choose to manually remove the cache or use a reliable cleaner tool like PowerMyMac, the process is straightforward and can significantly enhance your Mac's efficiency.
PowerMyMac, with its comprehensive set of features and the dedicated "Junk Cleaner" module, provides a reliable and user-friendly solution for clearing app caches, including the BlackHole cache. Its ability to scan and remove junk files efficiently ensures that your Mac remains clutter-free and operates at its best.
For a hassle-free and efficient cleaning experience, I recommend using PowerMyMac as your go-to cleaner tool. Its intuitive interface, powerful cleaning capabilities, and regular updates make it a reliable choice for maintaining your Mac's performance.
Clearing the BlackHole cache with PowerMyMac or a similar cleaner tool not only improves your Mac's overall functionality but also ensures a smoother experience when using the BlackHole app for capturing and routing audio on your Mac.

