There are some Mac users who are wondering what is a MacKeeper. There are users that say it just instantly appear on their Mac and wondering if is MacKeeper a virus or not. That is why in this article, we are going to discuss to you if this app is a virus or not. And we are going to let you know more about the MacKeeper.
There has been a lot of controversies that is going on regarding the MacKeeper which includes the fact that it actually appears on your Mac unknowingly. Also, it has been also said that MacKeeper is commonly used as a Trojan. That is why once that you get the MacKeeper from a wrong place, then there is a high chance that you might end up getting your Mac vulnerable to those hackers.
TIPS:
- Best Way to Uninstall Tor Browser Completely on Mac
- How to Uninstall Wacom Drivers on Mac (Quick Guide)
Article GuidePart 1. All About the MacKeeperPart 2. Is MacKeeper A Virus?Part 3. Getting Rid Of The MacKeeper from Mac For Good!Part 4. Conclusion
Part 1. All About the MacKeeper
MacKeeper was developed by the Zeobit, LLC. The MacKeeper is known to be a multi-functional system utility that was specially made for Mac. This software is known to consist of several tools that can be used for security, system optimization, and as well as for cleanup.
MacKeeper is also said to be a strange software on a Mac device. And because of this, it had become a controversy all over the Mac world. The MacKeeper is actually a utility software that is intended to be in a Mac device. However, it has been accused that the said software is not able to perform any task as it was advertised and also people are having a hard time uninstalling the said program.

Part 2. Is MacKeeper A Virus?
Actually, the MacKeeper program is not a virus. People would just actually tend to say that it is a virus because there are instances that it instantly appear on your Mac without knowing where did it come from. As what was mentioned earlier is known to be a made especially for Mac devices.
However, there are a lot of people who are not aware of what a MacKeeper is and they were also not notified as to when they got this application. That is why many of those people would think that the MacKeeper is a virus that is why they would need to uninstall the said application from their Mac.
But the problem is these users do not know how can they get rid of the MacKeeper completely from their Mac. That is why let us go ahead and take a sneak peek on how things work in uninstalling the said application from your Mac.
Part 3. Getting Rid Of The MacKeeper from Mac For Good!
There are a lot of ways on how you can possibly get rid of the MacKeeper from your Mac for good. And since you would not want this on your Mac, here are the things that you can try out.
Method #1. Getting Rid of MacKeeper in Its Own Way
If you are going to go to the MacKeeper’s website, there are some simple steps that you can actually follow for you to be able to uninstall the MacKeeper from your Mac. Here is what you need to do according to its website.
Step 1: Click on the Apple menu and then go ahead and choose “Go”.
Step 2: From there, go ahead and click on “Applications”.
Step 3: From the window that will pop out on your screen, go ahead and double-click on the MacKeeper icon.
Step 4: Then on the MacKeeper’s menu, go ahead and simply choose Preferences.
Step 5: Then on the next window that will appear on your screen, go ahead and choose “General”.
Step 6: Then go ahead and uncheck the box for the option “Show MacKeeper icon in the menu bar”.
Step 7: Then, from the MacKeeper menu, go ahead and choose “Quit”.
Step 8: Then drag the program app icon from the Applications window going to your Trash.
Step 9: Then you will be asked to enter your admin password twice.
NOTE: After doing all the steps above, your Mac may then redirect you to a website wherein you will be asked for the reason as to why you are uninstalling the MacKeeper from your Mac. This is optional to do.
Method #2. Getting Rid of MacKeeper the Manual Way
Another way for you to be able to get rid of the MacKeeper from your Mac is by uninstalling it the manual way. This method is considered to be one of the most effective ways for you to uninstall a certain application from your Mac. However, this could be time-consuming. So you have to make sure that you have all the time in the world when you are planning to do this.
For you to uninstall the MacKeeper from your Mac manually, here are the steps that you will be needing to follow.
Step 1: Go ahead and launch Finder on your Mac.
Step 2: From there, go ahead and choose the Finder’s Go menu and then choose “Go to Folder”.
Step 3: And then, from the dialog box that will appear on your screen, go ahead and type in ~/Library and then click on the Go button. Doing this will allow you to open your Library folder which is commonly hidden on your home directory.
Step 4: Then, once that you have found the folder that has the name MacKeeper Backups, go ahead and drag it over to your Trash to remove.
Step 5: After that, go ahead and scroll through your Library folder and then open the Application Support.
Step 6: From the Application Support folder, go ahead and locate all the files and folders that have the name MacKeeper on it and have them drag over to your Trash to remove.
Step 7: After that, go ahead and go to your Library folder and then launch the Cache folder. From that folder, go ahead and locate all the folders that have the name com.mackeeper.MacKeeper, com.mackeeper.MacKeeper.Helper or some other files that has the name MacKeeper on it.
Step 8: Once that you have found all files or folders, go ahead and drag them over to your Trash and remove them.
NOTE: You can look for the same file name or folder name in the following other folders on your Mac.
- LaunchAgents
- LaunchDaemons
- Preferences
Once that you have found all of them and have them dragged to your Trash, the last step that you are going to do is to Empty Trash.
Method #3. Getting Rid of the MacKeeper Using Third-Party Tool
Aside from the methods that we have mentioned above, there is another for you to get rid of the MacKeeper from your Mac. This is by using a third-party application that will be able to help you in uninstalling applications from your Mac completely. And with this, the powerful program that we can recommend is by using the iMyMac PowerMyMac's Uninstaller.
The iMyMac PowerMyMac Uninstaller is a very useful tool that you can use for you to remove any applications that you have on your Mac together with all the files or folders that is associated with the application. All of this with just a click of a button.
Now, for you to know on how you can uninstall the MacKeeper on your Mac using the iMyMac PowerMyMac Uninstaller, here are the simple steps that you can follow.
Step 1. Download and Install iMyMac PowerMyMac
The first thing that you need to do is to download the iMyMac PowerMyMac from the official website at www.imymac.com. And once that you have downloaded PowerMyMac, go ahead and have it installed on your device.
Step 2. Launch the Program
After successfully installing the iMyMac PowerMyMac on your Mac, go ahead and launch the program on your Mac. As you notice on the main interface of the program, you will be able to see the system status of your Mac by default. This is a real-time status which means it is the current status of your Mac while you are using it.
Step 3. Select Uninstaller Module
Still, on the same page, you will also be able to notice that there are 6 main different modules on your screen. From that list, go ahead and choose the Uninstaller module for you to be able to start uninstalling the MacKeeper from your Mac.
Step 4. Scan for Your Mac's Applications
Once that you have already selected Uninstaller, the iMyMac PowerMyMac will then ask you to scan your Mac to find all the applications that you have. For you to do this, just go ahead and simply click on the Scan button.
From there, all you need to do is to wait until the scanning process is complete. You will be able to know that the process is complete once that you see a full circle on the left panel of your screen.

Step 5. View the Result
Once that the scanning process is done, all the applications that you have on your Mac will be listed on your screen.
NOTE: If you did not find the application you are looking for, you can go ahead and click on the Re-scan button.
Step 6. Select the MacKeeper Application
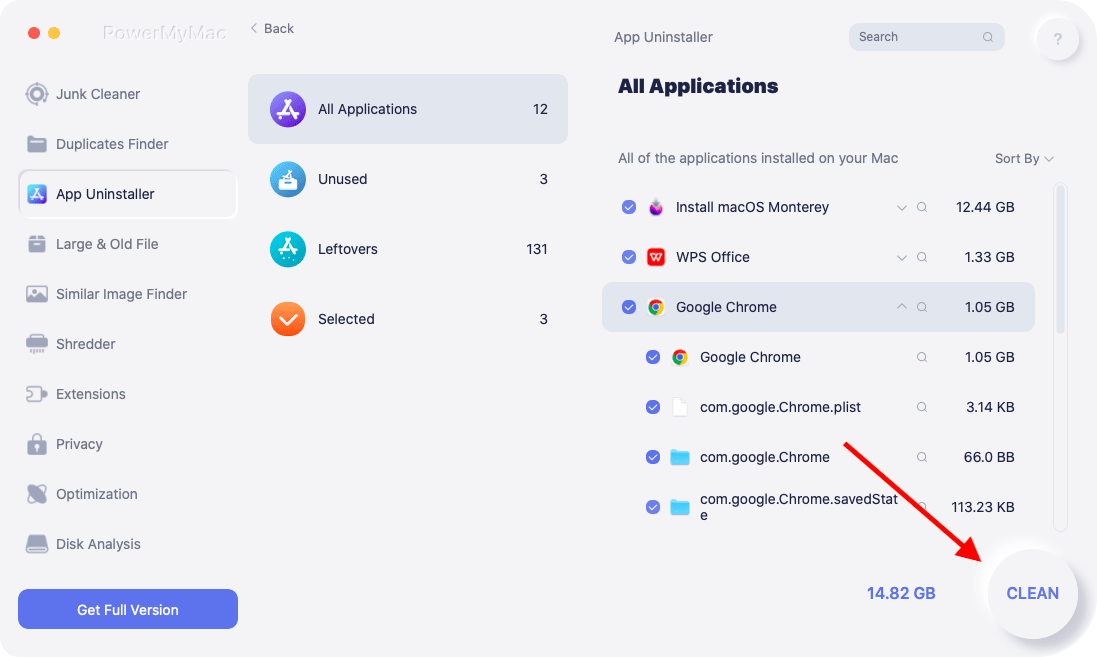
From the list of applications shown on your screen, go ahead and locate the MacKeeper apps on the list. Once that you have found it, go ahead and click on the app. This will then expanded on the right part of your screen.
Step 7. Choose All The Files to Clean
Once that you have clicked on the MacKeeper application, it will be expanded on the right part of your screen. And on that part, you will be able to see all the files and folders that are associated with the MacKeeper application.
All you need to do from there is to choose all the files and folders that you would want to delete and mark them one by one. Or you can simply click on the Select All option at the top of your screen to select all the files or folders.
Step 8. Clean Up MacKeeper
Once that you have chosen all the files and folders that you would want to remove from your Mac, go ahead and click on the Clean button below, the cleaning and uninstalling process will then start. The MacKeeper application will then be completely removed from your Mac. Same goes with all the files and folders that are associated with the said program. All this with just a single click of a button.

Part 4. Conclusion
So there you have it! The MacKeeper is not actually a virus on your Mac. It just so happened that it has a lot of conflicts with your device. So if you would want to remove this from your Mac, you can go ahead and make use of any methods that we have mentioned above.
But the most recommended method is by using the iMyMac PowerMyMac Uninstaller. This way, you will be able to uninstall the MacKeeper – or any other applications on your Mac – easily with just one click. This is how powerful the iMyMac PowerMyMac Uninstaller is. As it can uninstall any applications on your Mac and at the same time, it can also remove all the files and folders associated with the application.


