Chromebook users would be delighted to know that their devices have a built-in screen recording function. It can capture the screen activities during calls, seminars, meetings, conferences, etc. It’s indeed a vital feature every user needs. This article will focus mainly on sharing the process of how to stop recording on Chromebooks. The screen recording function can also be disabled if wished and that would also be discussed here. Details relative to screen recording with audio on Chromebooks will also be highlighted in a section of this article as well as how one can easily take screenshots if desired.
Contents: Part 1. How Do I Start and Stop Recording on My Chromebook?Part 2. How to Screen Record on Chromebook with Audio?Part 3. How to Screenshot on a Chromebook via the Keyboard?Conclusion
Part 1. How Do I Start and Stop Recording on My Chromebook?
Right away, we’ll be exposing the detailed process of how to stop recording on Chromebooks in this part. You can do it by just pressing a few keys on the keyboard. Check out the below for more details.
- To screen record on a Chromebook, you can either use the “Show Windows Key” or the “Screen Capture” menu that you’ll find on Quick Settings.
- When the recording is done, you can easily stop it by just pressing the “red” dot that’s at the bottom area of the screen. A notification mentioned that a screen recording has been taken will be displayed on the screen afterward.
- To check where the recording is, go to “Launcher”, choose “Files”, and then the “Downloads” folder. Managing the file’s type can be done by tapping the “gear” icon (Settings) that’s on the toolbar of “Screen Capture”.

How to Disable Screen Recording on Chromebook?
Upon reading the previous section, you surely realized that the process of how to stop recording on Chromebooks is too easy. Now, let’s proceed with the tutorial on how you can restrict the usage of the screen recording function on your device just in case you’re wondering about it as well.
#1. Switch on “Lock Screen”
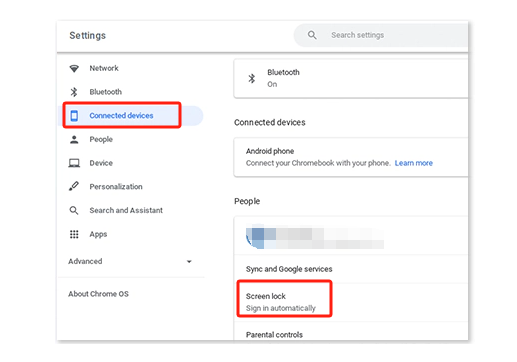
Enabling the “Lock Screen” on your Chromebook will disable the “Screen Capture” feature. By default, this should have already been switched on, but just in case it isn’t, you can follow the below.
- Go to “Settings”.
- Head over to “Connected Devices” and then select “Screen Lock”.
- Input the “Lock Screen” password you’d like to use. Look for the “Show lock screen when working from sleep” option and toggle the menu beside it.

#2. Try Restricting Apps
You may also restrict the apps on your Chromebook to disable screen recording. Turning off the apps’ permissions to access your screen is what you have to do. You can just follow the below steps.
- Go to “Settings”. Choose “Google Play Store” and then select “Manage Android Preferences”.
- Under the “Device” section, choose “Apps”. This is where you can switch off the app’s permissions.
#3. Utilize a Guest Account
To avoid getting your screen recorded or permitting the function’s usage while you’re using the device, you may try logging in using a “Guest Account”. Doing so will even keep you safe and secured from any other risks of external threats.
Apart from learning how to stop recording on Chromebooks, you’ll also see in the next part how you can screen record on your Chromebook with audio.

Part 2. How to Screen Record on Chromebook with Audio?
Chromebook users can take advantage of their devices’ built-in screen recorder to capture recordings with audio. As previously mentioned, we’re not only into highlighting how to stop recording on Chromebooks but also how one can capture his screen if he isn’t aware yet.
We have the tutorial presented below.
- Launch your Chromebook’s “Quick Settings” panel. Expand it to view the available options.
- Look for the “Screen Capture” menu. Press it to open its toolbar.
- Once you have seen the toolbar on your screen, you may start screen recording right away when desired.
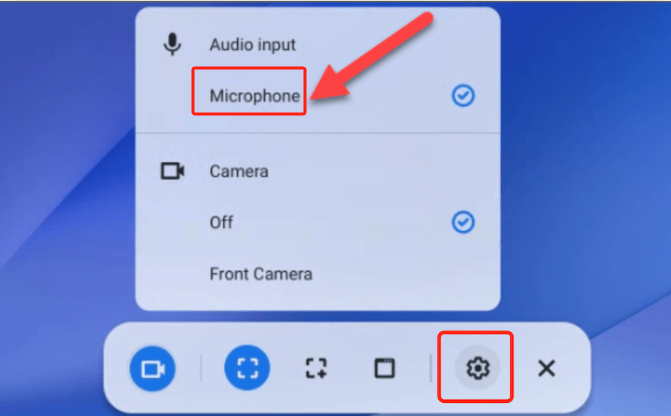
- On the left side area, you will see options to take screenshots (the camera icon) or capture your screen (the video camera icon). Don’t press any button yet.
- Before commencing with recording, decide on the area that you’d like to capture. Besides the “Record” menu, icons for the available recording area selections can be seen – “Full”, “Partial”, or “Window”. Select one as per your liking.
- To make sure the audio settings are good, press the “Settings” button. You may record both your microphone and system audio if you wish to.
- To finally begin, click the “Record” menu. When finished, press “Stop”. The recording should then be saved to your Chromebook which you can now access whenever you’d want to.

Part 3. How to Screenshot on a Chromebook via the Keyboard?
Now that you know how to screen record and how to stop recording on Chromebooks, we’ll now move into the easy method of taking screenshots with the use of your Chromebook’s keyboard. It’s as simple as using this keyboard shortcut – “Shift + Control + Show Windows”. Pressing this key combination will let you see the “Screen Capture tool”. You can utilize this to take a snapshot of a specific region on your screen. Otherwise, if you want to capture a screenshot of your whole screen, you can just press “Control + Show Windows”.
Bonus: Best Tool to Screen Record and Screenshot on Chromebook
Though you might be satisfied with the built-in screen recording and screen capture functions of your Chromebook, we can’t deny the fact that they somehow lack advanced features. In this case, if you’re looking for a tool that can help you with advanced screen capturing, it’s best that you turn to professional software tools like the iMyMac Screen Recorder. This is proven reliable and can record your screen, webcam, and even audio as well as assist with taking screenshots. It also has editing menus and other features that you can take advantage of. It’s supported by both Windows and Mac OS so installing it on your Chromebook won’t be an issue.
Get A Free Trial Now! Intel Mac M-Series Mac Get A Free Trial Now!
Conclusion
Hopefully, you are no longer wondering how to stop recording on Chromebooks. It should be easy as you only need to press a few keys on your keyboard. The same goes with screen recording as you can utilize the built-in screen recorder on your Chromebook. Additionally, if you’re eyeing to install a professional screen recording app, iMyMac Screen Recorder could be worth giving a shot.


