


Snipping Tool has been a popular program that’s mostly used by lots of users especially when taking quick snapshots as it’s a built-in and free tool that’s easily accessible. If you happen to suddenly encounter the “Snipping Tool not working” issue – snips are getting cut off or inability to choose the window after capturing a screenshot, etc., there are several actions that you can take to get this addressed. Let’s begin by digging further into the reasons why this issue is occurring as we move to the first part.
Contents: Part 1. Why Is My Snipping Tool Command Not Working?Part 2. How to Fix Snipping Tool Not Working?Part 3. Alternative to Capture Screenshots When Snipping Tool Not WorkingConclusion
Part 1. Why Is My Snipping Tool Command Not Working?
Though you have been too annoyed with the “Snipping Tool not working” problem, it is still a good thing that there are various workarounds that can be done to get it fixed. But before we move into discussing those solutions, knowing the reasons behind the dilemma would also be helpful. Thus, we added this part of the article.
- Having an outdated graphics driver might be the culprit of the mentioned problem.
- There might have been interference from other apps that’s causing the Snipping Tool program not to work as usual.
- The installation of the app might have been corrupted.
- Your Snipping Tool’s certificate might have expired.

Part 2. How to Fix Snipping Tool Not Working?
The previously mentioned reasons for the “Snipping Tool not working” dilemma are only some of the possible causes. There might have been others. Regardless of what the root cause is, the important thing is to be aware of the actions that you should take to get this resolved. We have listed some effective workarounds that you may try.
Solution #1. Enable Background App Permissions
If the Snipping Tool hasn’t been granted access permissions to capture snips, it won’t work. Below is what you have to do.
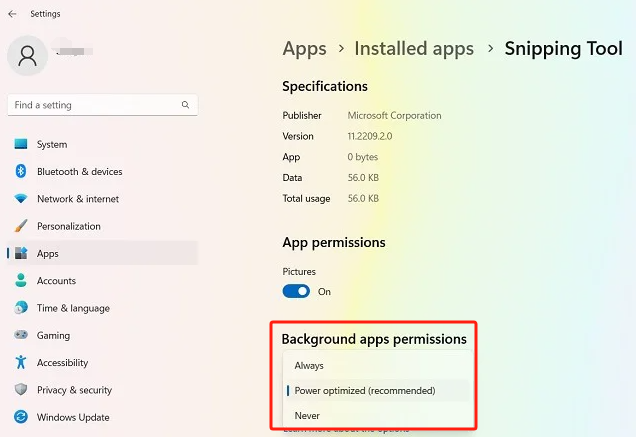
- Go to “Settings”, then to “Apps”, “Installed Apps”, “Snipping Tool”, “Advanced Settings”, and finally to “Apps & Features”.
- Ensure that app permissions for pictures have been switched on. Next, set up the “background app permissions” to be “Power optimized”.
Solution #2. Try Doing a System Clean Boot
The “Snipping Tool not working” might be showing up because of other apps’ interference while it’s in use. Thus, doing clean boots could be the key to resolving the issue.
- Go to the “Task Manager” menu.
- Look for those non-essential processes and end them.
- After completing step 2, re-launch the snipping tool and see if it’s now working well.
- If not, then try to perform a clean boot of the system.
Solution #3. Try Repairing and Resetting the App
Another option to fix the “Snipping Tool not working” issue is to repair and reset the app. Here’s what you need to do if you’d like to try it.
- Go to “Settings”, then to “Apps”, “Snipping Tool”, and “Advanced Options”, and then select “Apps & Features”.
- Head to the “Reset” menu and then press “Repair”. Wait for a few seconds while it’s ongoing.
- Once finished, a checkmark next to the “Repair” button will be seen signifying it has been done.
- Do the same for the “Reset” menu.

Solution #4. Disable the “Auto-copy to Clipboard” Feature
It might also be worth trying to switch off Snipping Tool’s “Auto-copy to Clipboard” feature. You may try and see if this will fix the “Snipping Tool not working” problem.
- Launch the Snipping Tool.
- Go to “Settings” by tapping the three horizontal ellipses.
- Look for the “Snipping” section. Ensure that the “Auto Copy Clipboard” menu has been switched off (by toggling it).
- Finally, try opening the “Snipping Tool” app again and see if the issue has now been fixed.
Solution #5. Try to Uninstall and then Install the Snipping Tool App Again
It might be worth trying to uninstall the Snipping Tool program and then install it again after a few minutes. Who knows? This could finally solve the “Snipping Tool not working” problem. Faulty installation of the app could be the reason why the issue has happened.
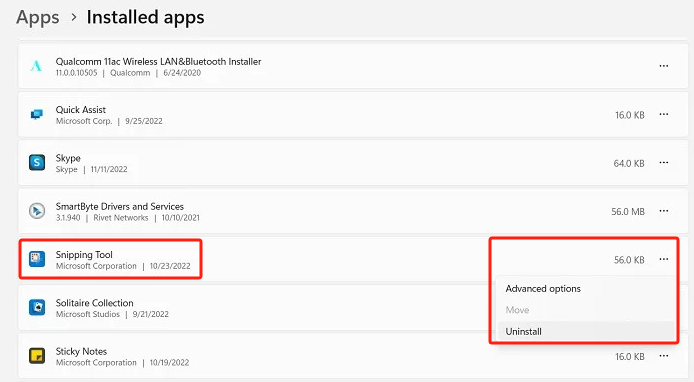
- From the “Start” menu’s “search” function, look for “Add or Remove programs”.
- Scroll down until you see “Snipping Tool”. Choose the “Uninstall” option.
- After completing the second step, try to reinstall the app from the Microsoft Store.
Solution #6. Switch Off the “Automatic Time” Feature Temporarily
Snipping might not be working due to the wrong date or time setup. Setting it up from automatic to manual could fix the problem. Here are the steps that you must follow.
- Go to “Settings”, choose “Time & Language”, and then “Date & Time”.
- Toggle the switch to “off” for the automatic time setting.
- Manually input the date and keep the time section as is.
Part 3. Alternative to Capture Screenshots When Snipping Tool Not Working
Even after all the previously shared solutions and the “Snipping Tool not working” issue are still present, it might be worth trying a great alternative that works well when taking screenshots. You may try using the iMyMac Screen Recorder. Though this was known to assist with screen recording mainly, you must be aware that it also has the “screen capture” function which you can utilize to take snapshots of your screen as needed. It has an easy interface, compatible with Mac and Windows OS, and offers bunches of other features.
Get A Free Trial Now! Normal Mac M-Series Mac Get A Free Trial Now!
Conclusion
If you have been bothered by the “Snipping Tool not working” problem, there are various solutions that you can try such as those that we have shared in this post. If all those won’t work, you just have to make sure that a professional tool like the iMyMac is with you so you can still take screenshots as needed!
