


Watching clips helps one easily understand the gist of long videos. Nowadays, posting such is also a trend as most viewers prefer shorter content. Examples of short clips that catch the viewers’ attention are highlights from gameplay, iconic scenes in a movie, main events on live streaming, etc. If you have been recently fond of watching video clips, you might be wondering how to clip on PCs so you can keep copies of them and watch them at a later time. Is it easy and simple? How can first-timers do it? Let’s find out as we move into the body of this article.
Contents: Part 1. Best Way to Clip on PCPart 2. How to Clip Gameplay on PC?Part 3. How to Clip on PC with Nvidia?Part 4. How to Clip on PC via OBS?FAQs
Part 1. Best Way to Clip on PC
If you are wondering about the best way of how to clip on PCs, you should then be aware that resorting to the use of professional screen recorders would be the best option. Though there are several available apps on the web, it is still recommended that you use the most reliable and proven effective, the iMyMac Screen Recorder.
Designed to let users screen record with ease, the abovementioned tool was also developed with various available features. It has menus for editing, real-time annotation, and even screenshot-taking. It has a simple and intuitive interface and supports both Windows and Mac OS.
Get A Free Trial Now! Normal Mac M-Series Mac Get A Free Trial Now!
Let’s take a quick look at the process of how to clip on PCs via iMyMac:
- Upon installing the app on your PC, head over to the “Video Recorder” menu.
- Choose to record only the screen or include the webcam and audio before selecting the recording area.
- Set up the audio settings as per your preference.
- Press the “Start Recording” menu to begin capturing your screen and tap the red “stop” button when you’re done.

You should see the recorded video on your PC shortly.
Part 2. How to Clip Gameplay on PC?
An avid gamer would probably be curious about how to clip on PCs specific to his gameplay sessions – perhaps, to record good games for reference or sharing. Good thing, that built-in tools like the Xbox Game Bar are readily available. This was designed specifically to capture gameplay but as time passes by, this has been utilized for recording one’s screen activities regardless if those are gaming content or not.
To record clips on your PC via the Game Bar, here’s what you need to do.
- Go to “Settings”, then to “Gaming”, and “Captures”. Look for the “Record in the background while I’m playing a game” and enable it.
- Adjust the settings relating to clip recording – choose the clip length via the “Record the last” menu and ensure that the two options below will be checked.
- Open the game to capture and then hold the “Windows”, “Alt”, and “G” keys.

A prompt will be shown once the recording is finished.
Clip on PC via Fortnite's Auto-clipping
One of the most popular games is Fortnite. If you have been fond of it and you’re curious about how to clip on PCs via its auto-clipping feature, you’ll find out more about it in this section of the article. It’s totally helpful especially when you are always immersed in the game that you tend to record your gameplay sessions.
Setting up automatic clipping on Fortnite should be simple. Via the SteelSeries GG app, head to the “Settings” icon and then scroll down until you see the “Moments” menu. Press the “Auto-clip” tab next. By default, the feature is switched on automatically. You can have this disabled if you wish to.
The typical clip settings relative to quality and length will be followed. These can also be modified and set via the “Moments Settings” section.

Part 3. How to Clip on PC with Nvidia?
Designed for clipping when gaming, one can also take advantage of the Nvidia Graphics card in the process of how to clip on PCs. Streaming games while recording is ongoing is possible through it. It is considered ideal when it comes to capturing gameplay.
If you’d like to try recording a clip via this option, the below steps must be followed.
- If you haven’t installed the GeForce Experience on your PC, install it first as you can only use Nvidia to record clips via it.
- On the “Start” menu, search for “GeForce Experience”.
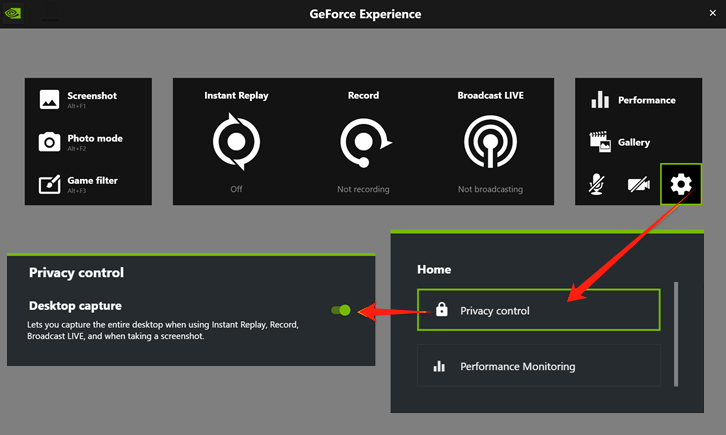
- Go to “Settings” and then to “IN-GAME OVERLAY”. You can see here if your PC is compatible with Nvidia Share.
- Adjust your clip-capturing settings by heading to the “Privacy Control” option and then turning on “Desktop capture”.
- Head back to the main page. Turn on “Instant Replay”. This shall let you preserve the recorded game’s last few seconds (30 seconds or a custom time). Click the “Alt” and “F10” buttons afterward.
Part 4. How to Clip on PC via OBS?
Another method of how to clip on PCs would be via OBS. This is also a known free and open-source screen recording tool. If you wish to try using it, follow the guide below.
- Launch the OBS Studio upon installation.
- Press “Show Capture” by clicking the “+” menu under “Sources”. Tap “OK” next.
- Select a display before tapping “OK”.
- To begin recording, click the “Start Recording” option.
- Once finished, just press the “Stop Recording” menu.

FAQs
- What is the clip button on a PC?
The “Windows + Alt + G” key combination is considered the clip button on PCs.
- How to clip the last 30 seconds on a PC?
One can take advantage of built-in tools like the Game Bar and OBS Studio or other options like the Nvidia Graphics card and the iMyMac Screen Recorder to clip on PCs.
- How to enable clipping on a PC?
