Among the many gaming consoles, one of the most popular is the Nintendo Switch. You'll surely be fond of continuously using the many games you can play on it. This is regarded as both a portable device and a home console – the major reason why you’ll see most games available on Nintendo Switch.
If you have been fond of using Nintendo Switch, you might have already considered recording your gaming sessions. But are you aware of the process of how to screen record on Switch? Don’t worry, we’ll walk you through the detailed process as you read the content of this post.
Contents: Part 1. Does the Switch Have a Recording Feature?Part 2. How to Screen Record on Switch for More Than 30 Seconds?Part 3. How to Screen Record on Nintendo Switch without a Capture Card?Part 4. How to Record Fortnite Lobby on Switch?FAQs about Recording on Switch
Part 1. Does the Switch Have a Recording Feature?
If you have been curious, a Nintendo Switch has a recording feature. By using a Capture Card, you can screen record your gameplay as you like. For your reference, here’s what you need to do.
- Ensure that you have prepared the Capture Card and HDMI cables to be used.
- Connect your Switch and Capture Card via an HDMI cable.
- You now have to connect your Switch to your PC.
Via a Windows screen recorder, your gameplay will be captured.

Part 2. How to Screen Record on Switch for More Than 30 Seconds?
Though the built-in recording tool on Switch is good enough, it has a known limitation – recording can only be done for up to 30 seconds. Now, if you have been eyeing to capture your lengthy game sessions, you’d have to look for the best alternative. We recommend using the iMyMac Screen Recorder. In this section, we’ll share with you how to screen record on Switch via this tool. This is a professional app that can assist with screen, webcam, and audio recording and has enormous features that users can enjoy.
Take a quick look at the below guide on how you can capture your Switch gameplay via the abovementioned app.
Get A Free Trial Now! Normal Mac M-Series Mac Get A Free Trial Now!
- Once installed, open the app and look for the “Video Recorder” menu. Tap it upon ensuring that you have connected your Switch to your PC.
- Modify the recording settings – specify whether to capture only the screen or include audio and the webcam as well, the recording area, etc.
- Adjust the audio settings if needed.
- Tap the “Start Recording” to begin and once completed, hit the red “Stop” button.

Without any limitations, you’ll get to record your Switch gameplay as you wish!
Part 3. How to Screen Record on Nintendo Switch without a Capture Card?
A Nintendo Switch has a pre-installed gameplay recording tool that can be utilized by users when trying to record gameplay sessions. This is a convenient method as users won’t need to set up a capture card plus, it’s free! It’s just that you have to be aware that this can only accommodate recording for up to 30 seconds as also previously mentioned. Nevertheless, this is a simple way to resort to when trying to capture recordings of your Switch gaming sessions.
To know more details about how to screen record on Switch via this tool, check out the below guide.
- Begin your gameplay.
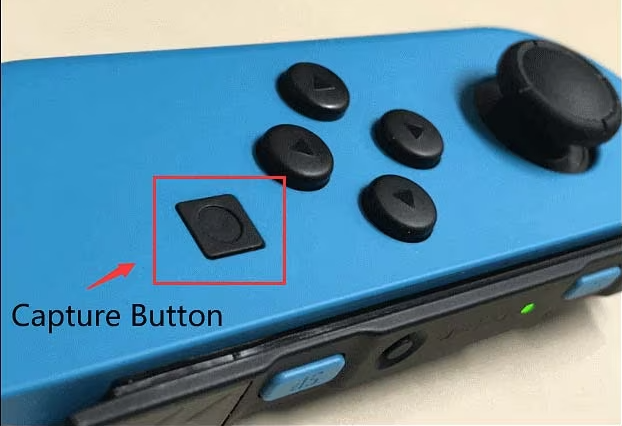
- On the controller, press and hold the “Capture” button.
- To begin recording, do a long press. Upon finishing, the captured video should be saved in “Album”.

Part 4. How to Record Fortnite Lobby on Switch?
In this section, details relating to how to screen record on Switch – Fortnite Lobby will be explained. If you’re interested in this information, then just keep reading.
#1. Via the Built-in Tool
To record Fortnite Lobby on Switch, utilizing the built-in tool would be effective. Again, you have to keep in mind that it has a recording limitation as it can only capture up to 30 seconds of the recording. Thus, capturing long videos can’t be done. But if you’re good with this, utilizing the built-in tool would surely be convenient for you.
- On your Switch, play Fortnite.
- On your Joy-Con, press the “Capture” button when you’re ready to record.
- Long press this button to finally start recording. You should see the recorded file in “Album”.

#2. Via the Xbox Game Bar
You may also use the Xbox Game Bar in the process of how to screen record on Switch – Fortnite Lobby. You don’t have to install anything as this is already pre-installed on your Windows PC. If you like to give it a try, then just follow the below.
- Make sure to connect your PC and Switch with a Capture Card. Launch the Gamer Bar by pressing the Windows and G keys.
- Press the “Record” button to begin recording.
- Once finished, tap the red “Stop” button. Alternatively, you may press the Win + Alt + R buttons.
#3. OBS Studio
Is OBS Studio also applicable in the process of how to screen record on Switch – Fortnite Lobby? Well, of course! Being an open-source and free tool, surely, many would wonder about the same. Here’s a guide for you.
- Once downloaded and installed OBS Studio on your PC, open it. Select a game capture source.
- Press “Mode” to choose the recording area to use.
- Now tap the “Start Recording” menu to begin capturing your game session. Click the same button again to stop recording.

FAQs about Recording on Switch
Here are some FAQs about this article’s main topic - how to screen record on Switch.
- Why can't I record it on my Nintendo Switch?
There could be lots of possible reasons why you can’t record on your Nintendo Switch. Some of those are – your console’s OS might be outdated, there could be an issue with the recording software in use, the game itself is the reason, etc.
- Can you record more than 30 seconds on Nintendo Switch?
Via the built-in tool on Switch, recording is only limited to up to 30 seconds. If you wish to capture longer videos, then it’s recommended that you resort to utilizing tools like the iMyMac Screen Recorder.
- Can you record replays on Switch Fortnite?
Yes! All you have to do is click “Career” from the main menu and then choose “Replays”.


