


Being an Acer laptop user surely made you enjoy multiple different perks offered by the device itself. In some instances, some concerns are often neglected but when needed to be addressed, users are caught with finding the fastest method to solve the case. The same goes for capturing screenshots. While others think of it as insignificant, some find it very vital to learn. Are you also one of those curious about how to screenshot on Acer laptops? We got you then!
Being well aware of how to capture screenshots is helpful especially when one is into making tutorials, presentations, or guides or even when just capturing important details during a call or while on a seminar or conference. Fortunately, there are a bunch of ways to capture screenshots specifically on Acer laptops. And, those are what we’ll further tackle in this article.
Contents: Part 1. How to Screenshot on Acer with a Keyboard?Part 2. How to Screenshot on Acer Desktop without Print Screen Button?Part 3. Conclusion
Part 1. How to Screenshot on Acer with a Keyboard?
The good thing about taking screenshots on Acer laptops is that you can do it with the help of keyboard shortcuts. The whole process is pretty straightforward. When you capture snapshots via your keyboard, the images captured will immediately be saved to your Acer laptop. However, there are some instances when you’ll need another program to view the photos taken.
So, here’s for your easy reference when it comes to the different methods on how to screenshot on Acer laptops using your keyboard.
#1. On Windows 7
If you’re using a Windows 7 Acer laptop, here’s what you need to follow.
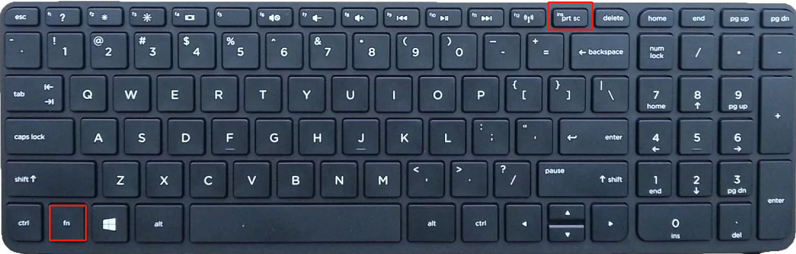
- Locate the “Print screen” button on your keyboard and press it.
- Launch the “Paint” app. Press “Control + V” to paste the screenshot taken.
- If the “Print Screen” button won’t work alone, hold the “Fn” key as well.
#2. On Windows 8 or 10
Capturing snapshots on Windows 8 and 10 Acer laptops is quite automatic. Check the below for your reference.
- Click the “Windows” key and then tap “Print Screen”.
- Head over to the output location. You should see the captured screenshot there.
The good thing with this method is that there is no need for app installation especially if you’re in a hurry to take screenshots. However, customizing the shortcuts isn’t possible and one would need to be familiar with the key combinations.
Fortunately, there are other ways how to screenshot on Acer laptops that we’ll discuss in the next part.

Part 2. How to Screenshot on Acer Desktop without Print Screen Button?
If you’d like to experience other methods of how to screenshot on Acer laptops that are pretty much advanced or if you’re someone who’s not into memorizing shortcuts, checking out the options that we have highlighted in this section would be a good move for you.
#1. Using iMyMac Screen Recorder
When you want to achieve the best results and you’re aiming for the best experience, utilizing a professional app is the way to go. One of the suggested tools that can assist with taking snapshots on Acer laptops and other Windows or Mac PCs is iMyMac Screen Recorder. It’s designed for the screen, webcam, and audio recording but has also a feature that allows users to screenshot with ease.
Get A Free Trial Now! Intel Mac M-Series Mac Get A Free Trial Now!
Here’s how to screenshot on Acer laptops via the iMyMac tool.
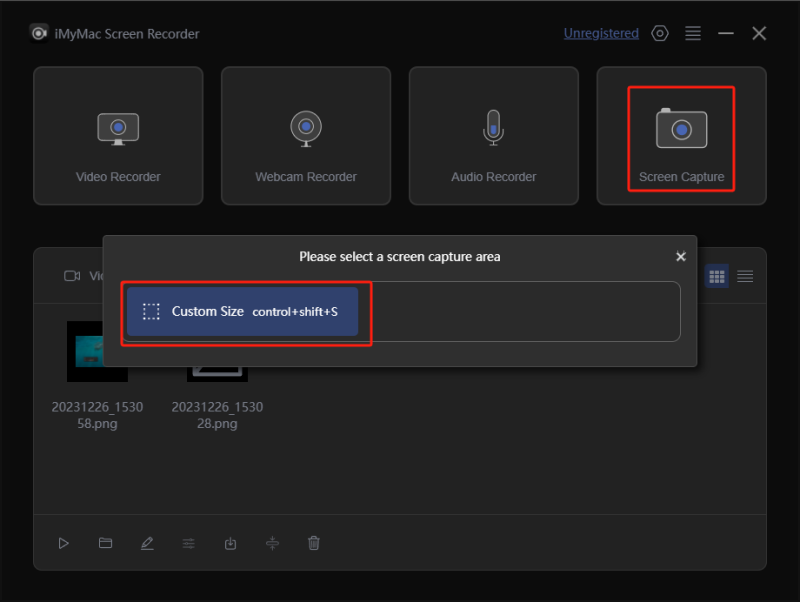
- When opened, press the “Screen Capture” menu.
- Specify the area to capture by pressing the “Custom Size” button.
- Head to the section to screenshot. You can use the available editing menus if desired to further enhance the photo taken.
- Once finished, hit the checkmark. You see the image saved to your Acer laptop right away.
#2. Using the Snipping Tool
If you’re not into installing an app, resorting to pre-installed and free programs on your Acer laptop could suit you. You may also try using the Snipping Tool. It’s also a good software that you can use in the process of how to screenshot on Acer laptops.
- Open the Snipping Tool on your Acer laptop and press the “New” menu.
- Move the move to the area you wish to screenshot.
- When captured, hit the “Save As” menu. You may save depending on the format you desire.
- Go to the output location to view the screenshot.

You may also copy the image and paste it to another app like “Paint” to perform basic editing.
#3. Using the Game Bar
Another built-in tool on Acer laptops that you can utilize when taking screenshots is the Game Bar. It’s free to use and has a simple UI. Though mainly dedicated to capturing gameplay sessions, you can further use its features.
- Open the Game bar by pressing the “Windows and G” buttons on your keyboard.
- Decide on the area to capture before pressing the “camera” icon. Alternatively, pressing the “Windows, Alt, and Print Screen” keys could also help you capture and save the image automatically.

You should be able to see the images from the “Captures” folder.
#4. Using Snip & Sketch
Snip & Sketch also works almost the same as the Snipping Tool. Of course, this can also be used in the process of how to screenshot on Acer laptops.
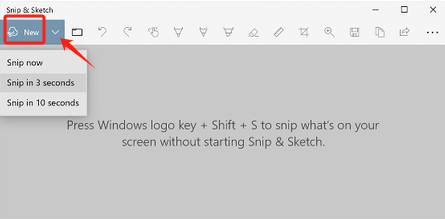
- Open the Snip & Sketch program.
- Press the “New” menu. Proceed to choose the type of screenshot to take.
- Take a screenshot.
- You may or may not edit the captured image as you wish before saving it.
#5. Using a Chrome Extension
Another method of how to screenshot on Acer laptops is by using a Chrome extension. From the Chrome web store, some extensions can be installed and help with capturing screenshots. You can also resort to this but you have to make sure that your laptop is connected to a stable network to avoid any issues.
Part 3. Conclusion
In the process of how to screenshot on Acer laptops, one can resort to relying on using keyboard shortcuts. However, due to the lack of other advanced options, it’s still recommended to use apps like the iMyMac Screen Recorder. If app installation isn’t preferred, various built-in and free tools such as Game Bar, Snipping Tool, and Snip & Sketch can be utilized. Online options like Chrome extensions are also available.
