


Knowing how to screenshot on Asus laptops would benefit Asus laptop users, especially those who are into creating content like tutorials, guides, presentation materials, and the like. Additionally, knowing how to will let one easily raise and share concerns with others in case of issues encountered as it is easy to communicate through images highlighting the problem rather than explaining it through words.
Contents: Part 1. How to Take Screenshots on An ASUS laptop with “PrtScn"?Part 2. How to Screenshot on an ASUS Laptop without the PrintScreen Button?Part 3. How to Take Screenshots in ASUS Laptop on Windows 7/10/11?Part 4. Conclusion
Part 1. How to Take Screenshots on An ASUS laptop with “PrtScn"?
If you are someone who’d like to take snapshots quickly for free without downloading or installing any software programs or extra apps, it would be advantageous to know how to screenshot on Asus laptops via keyboard combinations.
Using the “PrtScrn” Button
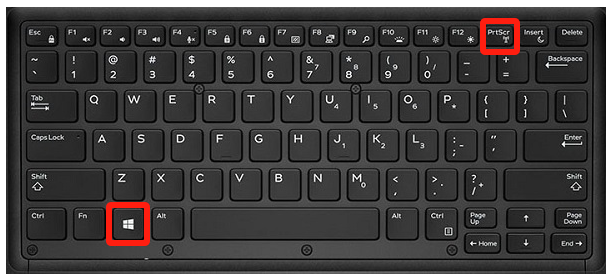
- On your keyboard, look for the “PrtScrn” button and press it. Doing so will let you take a screenshot of your screen. Automatically, it will be copied to your clipboard.
- You can open a “Paint” app and paste the image to it to save the file.
Using “Windows” + “PrtScrn” Buttons
- Press the “Windows” and “PrtScrn” keys at the same time.
- The screenshot taken will automatically be saved to your computer. You can also paste it to another app if you want to.
Using “Alt” + “PrtScrn” Buttons
- Try pressing your “Alt” and “PrtScrn” keys together. Doing this will let you take a screenshot of the active window on your device (not your full screen).
- Launch another app to paste the image captured to save or edit it.
Practically, the easiest way of how to screenshot on Asus laptops is just to utilize your laptop’s keyboard. Can you take screenshots without using the “PrtScrn” key? Let’s find out in the second part.
Part 2. How to Screenshot on an ASUS Laptop without the PrintScreen Button?
When it comes to the process of taking screenshots on Asus laptops without the “PrtScrn” button, you have plenty of ways to choose from. Three of those will be highlighted in this section of the article.
Using the Snipping Tool
- From your Asus laptop’s search bar, type “Snip” and press enter.
- You should see the Snipping Tool from the results. Click it to launch it.
- Prepare the screen to be captured. Select which one you’d like to use from the Snipping Tool's mode menu.
- Once you’re ready, press the “New” button. Just click and create a box around the section you wish to snip. Release your mouse afterward. You should then see the captured image.
- There are also some built-in editing menus on this app that you can use to edit the image. Press the “Save” button afterward to save the screenshot taken.

Using Snip & Sketch
Here, you’ll learn how to screenshot on Asus laptops using the Snip & Sketch app.
- Press your “Windows” key and look for Snip & Sketch.
- Launch the program once seen. Select a mode to use – Window, Rectangular, Fullscreen, or Freeform snip.
- Tap the “New” button to get a screenshot under the selected mode. There are options available to edit the image captured.
- Once done, click the “Save” button to save the new image on your Asus laptop.
Using Game Bar
You can also take advantage of the Game Bar to take screenshots. Here’s how to screenshot on Asus laptops using it.
- Ensure that your screen is ready.
- Launch the Game Bar by pressing the Windows + G keys.
- Press the “Camera” icon to take the desired screenshot.
- By default, you should see the captured images from the “Captures” folder. You can use other editing apps to alter the images as you wish.

Part 3. How to Take Screenshots in ASUS Laptop on Windows 7/10/11?
Fortunately, there are numerous ways of how to screenshot on Asus laptops. One can use keyboard menus and shortcuts as well as other programs such as the three that were shared previously. But just in case there are unexpected issues while using them, it would be good to know an alternative way of taking screenshots on your Windows 7, 10, or 11 PC or laptop. Luckily, there are apps like the iMyMac Screen Recorder that can help in such instances.
This tool is dedicated to satisfying a user’s needs when it comes to screen recording. It can even be used to capture webcam and audio while allowing the user to set up the audio settings as per his preference. Additionally, some functions are readily and easily accessible for every user – editing menus, real-time annotation tools, buttons to launch the webcam, restart, pause, and more.
Since our goal is to share how to screenshot on Asus laptops, one would surely be delighted knowing that this professional tool can also assist in the process. Here’s how.
Get A Free Trial Now! Normal Mac M-Series Mac Get A Free Trial Now!
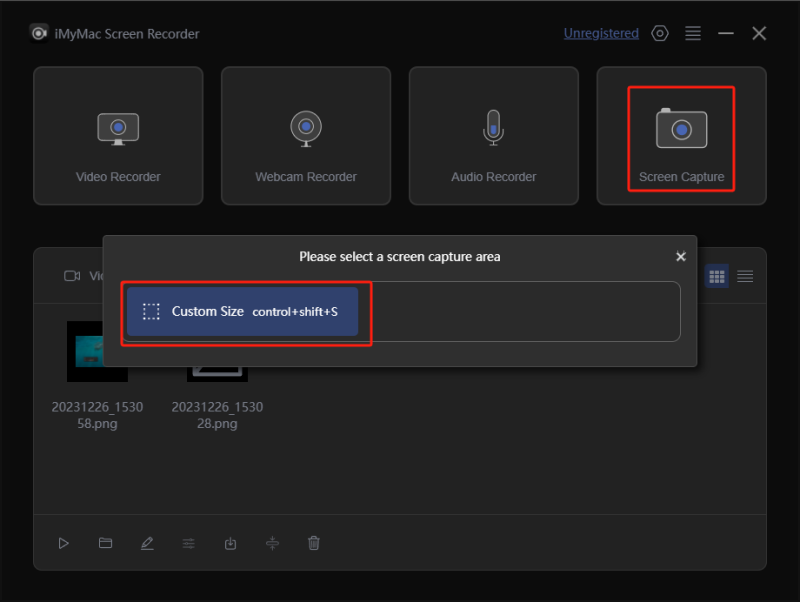
- Once installed, open the program and then look for the “Screen Capture” menu.
- To choose the area that you wish to capture, press “Custom Size”.
- Move your cursor to the section to be captured. Once the image is taken, you can freely utilize the available editing menus.
- Once finished, tap the check mark. Automatically, the screenshot taken will be saved to your Asus laptop.
Part 4. Conclusion
There are lots of ways of how to screenshot on Asus laptops. You can either use the “PrtScrn” button on your keyboard or rely on some other available and free apps like the Snipping Tool, Snip & Sketch, and Game Bar. All these are good enough and will surely satisfy your needs when it comes to taking screenshots. Additionally, if you’d like to try professional software programs, utilizing tools like the iMyMac Screen Recorder is also recommended!
