


Sharing snapshots of some documents, your screen, or an active Window on your Dell laptop will be easier if you have a good method of taking screenshots. It’s not that difficult if you’ll think about it. You just have to identify the most effective and efficient way to save time and promote better productivity.
In this post, our main topic will be the process of how to screenshot on Dell. Different methods will be highlighted as you jump from one section to another. Let’s begin!
Contents: Part 1. What Is the Key for Screenshots on Dell?Part 2. How Do You Screenshot on a Dell Laptop without PrScn?Part 3. How to Screenshot on Dell on Windows 10/11?Part 4. Conclusion
Part 1. What Is the Key for Screenshots on Dell?
The Print Screen key differs depending on the type of PC or laptop that you’re using. Most devices such as Dell laptops have this key which can be pressed directly to take a snapshot. Others can click the “Windows” and “Print Screen” buttons at the same time. If you happen to own one without this key, you can use the “Fn” + “Windows” + “Space Bar” buttons to take screenshots. The captured images will be saved in the “Screenshots” folder under “Pictures”.
How to Screenshot on Dell with PrintScreen Button?
The simplest way of how to screenshot on Dell is by using the “PrtScn” button. But you can apply some keyboard shortcuts to capture specific views that you like.
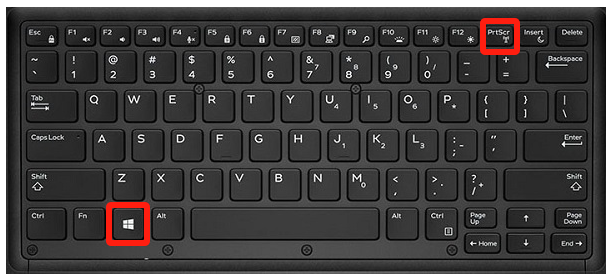
- For instance, on your Dell laptop, you may press the “Windows” and “PrtScn” buttons to capture everything that you have on your screen. In case you’re using a Dell tablet, you just simply need to press the “Windows” and “volume down” buttons at the same time to take a screenshot. If the Print Screen and F10 keys share the same button, the shortcut that must be pressed should be “Fn” + “Windows” + “PrtScn”.
- If you are only eyeing to capture your current open active window (not including the background, taskbar, or other elements), you just have to press the “PrtScn” button.
- When taking a snapshot of one window, the “Alt” and “PrtScn” menus should be tapped at the same time.
Upon taking screenshots, the captured images will be copied to your clipboard. You can paste it to your desired “Paint” app and perform some basic editing actions if you prefer to do so before saving it to your Dell device.
If you are not comfortable with the abovementioned method of how to screenshot on Dell, and you’re wondering if taking screenshots can be done without using these hotkeys, you then have to read what the next part has.
Part 2. How Do You Screenshot on a Dell Laptop without PrScn?
In this section, we will be highlighting various methods of how to screenshot on Dell without using the “PrtScn” button. Two effective tools will be mentioned here – Snipping Tool and Snip & Sketch.
Using Snipping Tool
This program can be launched via the “Start” menu. It gives the user the ability to select a portion of his screen to capture. From the “Mode” menu, one can choose the type of snip to take – Free-form, Fullscreen, Window, or Rectangular. Upon taking a snapshot, you can just press the “Save” or “Save As” button. Editing the image can be done as well before saving it.
Using Snip & Sketch
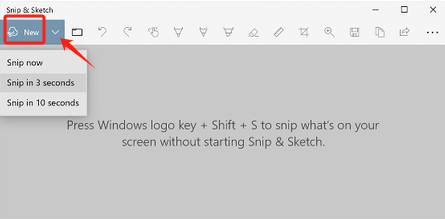
You can search “Snip & Sketch” from your apps and just open it once found. It works almost the same as the Snipping Tool. Tap the “New” menu to capture an image. Afterward, decide on the “Mode” to use. Upon capturing the image desired, you can copy and paste it to another app for editing. A “Share” button is also available just in case you wish to share the snip with others.
Part 3. How to Screenshot on Dell on Windows 10/11?
Apart from the previous ways of how to screenshot on Dell that were shared in the earlier parts of this article, you might be wondering if there are still other options for taking screenshots on your Dell device. Well, of course, there are! One of the best and most effective is by using a professional software program such as the iMyMac Screen Recorder.
The abovementioned tool is designed to help users satisfy their screen recording needs. It’s a reliable app that’s powerful enough to capture one’s screen activities. A user can even record his webcam and audio while choosing what type of sound to capture. Additionally, there are lots of available features and functions that any user can enjoy. It has menus for editing, real-time annotation tools, buttons to pause and restart, and more.
When it comes to navigation and ease of use, one does not need to worry as well. This app’s interface is simple and intuitive. Even beginners won’t find it hard to run through the menus as they are easy to understand. Installing it won’t be an issue as well since this is compatible with both Windows and Mac OS.
Get A Free Trial Now! Intel Mac M-Series Mac Get A Free Trial Now!
Here’s an easy guide on how to screenshot on Dell using the iMyMac Screen Recorder.
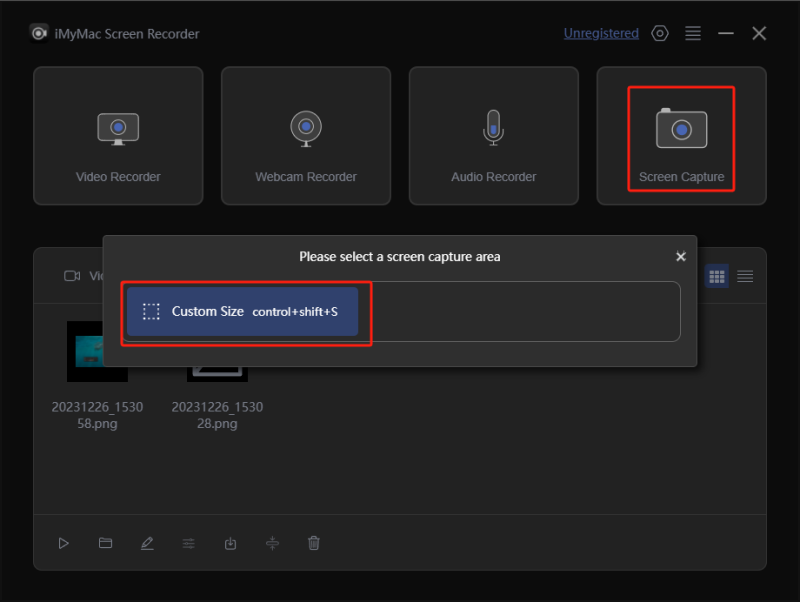
- Launch the app once installed and look for the “Screen Capture” menu from the main interface.
- Choose an area to capture by pressing “Custom Size”.
- Just navigate to the section or part of the screen that you want to capture. Functions to edit the captured image can freely be used.
- To finish, just tap the check mark. Automatically, the screenshot taken will be saved to your Dell device.
Part 4. Conclusion
There are simple ways of how to screenshot on Dell. One can utilize the “PrtScn” button to directly take snapshots or other hotkeys and shortcuts available. Apart from these buttons, free programs like Snipping Tool and Snip & Sketch can also be used. Alternatively, using professional software apps that are already trusted and reliable such as the iMyMac Screen Recorder would also be effective as other functions can be enjoyed out of it.
