


Whether you’re aiming to capture screenshots for your reference, create a presentation for school or work-related reasons, seek guidance due to an issue encountered, or create content you wish to share with everyone else, knowing how to screenshot on Gateway laptops would be vital. If you are a Gateway laptop user and haven’t seen the perfect reference to use yet, you now have nothing to worry about. In this article, multiple easy-to-do and simple-to-follow tips will be shared when it comes to capturing the screenshots that you need.
Contents: Part 1. What is the Shortcut Key for Screenshot on Gateway Laptop?Part 2. Best Way to Take A Screenshot on Gateway Laptop (Windows 10/11)?Part 3. Other Free Ways to Screenshot on Gateway LaptopConclusion
Part 1. What is the Shortcut Key for Screenshot on Gateway Laptop?
We will be starting with discussing how to screenshot on Gateway laptops by utilizing shortcut keys. Whether you have one running on OS 11 or XP, this method should work for you. However, you have to keep in mind that this will only apply to cases when you aim to capture a full screenshot. Using this to capture a specific section on your screen won’t be possible.
To try, here are the steps that you have to follow.
- On your Gateway laptop’s keyboard, look for the “Print Screen” key (“PrtScn”). Press it.
- Automatically, a screenshot will be taken and saved to your clipboard. There are no indications that a screenshot has been captured successfully so don’t expect one.
- You can just paste the image to another app if you want to perform some editing actions or if you wish to share it with others.

Part 2. Best Way to Take A Screenshot on Gateway Laptop (Windows 10/11)?
Utilizing shortcut keys is only applicable when taking a screenshot of your full screen. But what if you only need to capture a portion of it? What’s the best course of action to take then?
Thankfully, there are professional and reliable software apps like the iMyMac Screen Recorder that can help during the process of how to screenshot on Gateway laptops. This is not only a popular tool that can assist with lag-free and HD screen, webcam, and audio recording, but is also effective when it comes to capturing screenshots. More so, it has advanced features when it comes to annotations and editing which the users can also take advantage of. It has an intuitive yet simple interface which makes it fitting even to novices. Apart from supporting Windows OS, it is also compatible with Mac so, the installation of this app isn’t an issue at all.
Get A Free Trial Now! Normal Mac M-Series Mac Get A Free Trial Now!
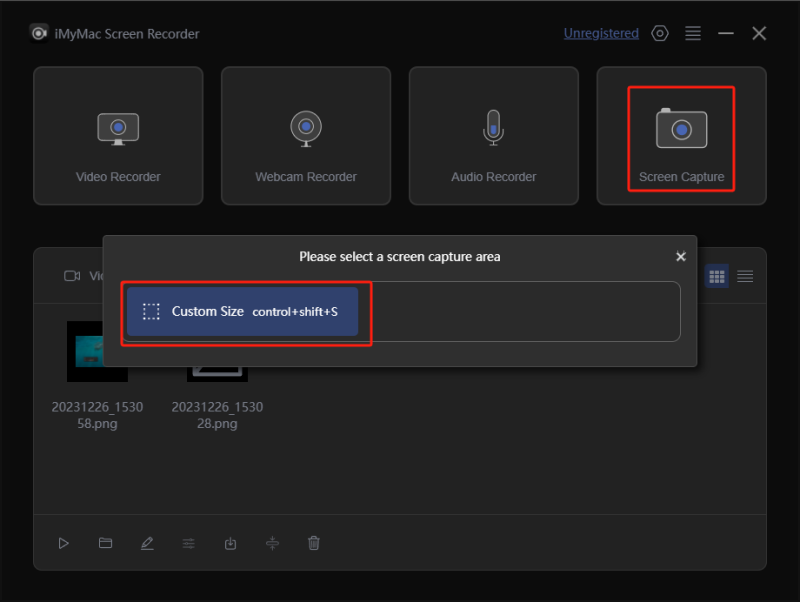
So, how can we use the iMyMac tool when taking screenshots via our Gateway laptops? That’s simple! Here’s a tutorial.
- When launched, hover to the “Screen Capture” menu and press it.
- Hit the “Custom Size” option and choose an area to capture.
- Move your cursor to the defined section to capture. Make use of the editing menus as needed.
- When finished, tick the “checkmark” to complete the process.
The screenshot taken should automatically be saved to your laptop shortly which you can access anytime you want to.
Part 3. Other Free Ways to Screenshot on Gateway Laptop
Upon providing details relating to the best tool to use in the process of how to screenshot on Gateway laptops, we still have this section wherein you’ll learn about the other free methods that you can resort to. You may check and try them as you please.
#1. Using Snipping Tool
Ideal for taking full screenshots or capturing a window or a free-form one, the Snipping Tool has been very popular among many users. It’s free and is a built-in tool on Windows computers so it’s convenient to use. It even has basic editing menus – highlighting, drawing, etc. Just take note that this is only available on computers running Windows 7 OS or higher.
For your reference, here’s how to screenshot on Gateway laptops via this tool.
- Open the Snipping Tool app by searching it from the “Start” menu.
- Press the “New” menu and hover your mouse over the desired area to capture.
- Once a screenshot is taken, you can use the available editing functions on the tool, open the image on another editing app, or just save it when you’re all good.

#2. Using Xbox Game Bar
Another built-in tool on Windows PC that can assist in the process of how to screenshot on Gateway laptops is the Xbox Game Bar. It’s also pretty easy to use, free, and simple. It can also be utilized when screen recording.
- To open this tool, either search for it or press the “Windows” and “G” buttons on your Gateway laptop.
- On the menu, select the “Capture” menu and then locate the “Camera” icon.
- Click the mentioned button to finally capture a screenshot. Pressing “Windows + Alt + Print Screen” on your keyboard should also work.

When done, a notification that the screenshot taken has been saved will be displayed.
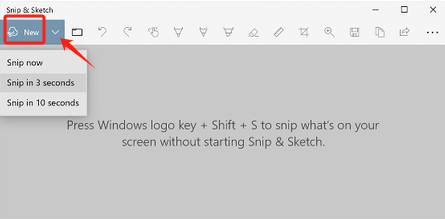
#3. Using Snip & Sketch
Apart from the previous two programs, you still have another built-in freeware on your Gateway laptop, the Snip & Sketch. We will also be sharing here how to screenshot on Gateway laptops using this app.
- From the “Start” menu, find the “Snip & Sketch” tool and just launch it.
- Hit the “New” button at the top. Select the type of screenshot to capture – free-form, full-screen, or rectangular.
- Take a screenshot.
- There are available editing menus in case needed. When all is good, tap the “disk” icon to save the image. Choose an output folder to use and name the file.
Conclusion
In the process of how to screenshot on Gateway laptops, we’re lucky that there are built-in and free tools that we can use such as the Snipping Tool, the Game Bar, Snip & Sketch, and even some shortcut keys. They are relatively easy to handle and even offer simple editing functions. However, they still pose limitations. To enjoy the best experience, the suggestion would still be to always use apps like the iMyMac Screen Recorder.
