


“How to screenshot on Windows 60 keyboard? I have been trying to figure it out ever since I switched from the traditional type but am not sure enough. I hope somebody can help me out.”
Due to the lack of some other necessary keys, those users who own 60% keyboard find it a bit difficult when taking screenshots on their computers. If you have been worrying about the same dilemma, you just need to stick until the end of this article as tutorials relative to how you can screenshot on Windows 60 keyboard will fully be explained here.
Contents: Part 1. What Is a 60% Keyboard?Part 2. How to Take a Screenshot on Windows 10 on a 60% Keyboard?Part 3. Best Way to Screenshot on WindowsPart 4. Conclusion
Part 1. What Is a 60% Keyboard?
As its name implies, the 60% keyboard is a type of keyboard that has only 60 keys. It does not have a numpad, navigation cluster, F row, as well as arrow keys. Such keyboards are often used by gamers and programmers as their design does not impact their functionality for these users. Plus, these people even prefer using this type as it has a compact design (freeing up space for mouse movement) and minimalist style. Moreover, these keyboards are also compatible with Windows, Mac, and Linux OS so there shouldn’t be any issues while it’s in use.
Now, let's move into the discussion about how to screenshot on a Windows 60 keyboard in the next part.

Part 2. How to Take a Screenshot on Windows 10 on a 60% Keyboard?
After giving some details about the 60% keyboard from the previous part, let’s finally move into the detailed process of how to screenshot on a Windows 60 keyboard. Four easy methods will be shared in this section.
#1. Using the Shortcut Key
Some users say that taking advantage of the shortcut keys is still the easiest method of how to screenshot on a Windows 60 keyboard. However, unlike on traditional keyboards, the “Print Screen” button is combined with other keys on a 60% keyboard. If you still prefer this way, then follow the below.
- On your keyboard, tap and hold the “Fn” key and click the “Print Screen” button next.
- You should be able to see the image (your entire screen) on your clipboard. Paste it to your desired “Paint” app if you’d like to make some modifications.
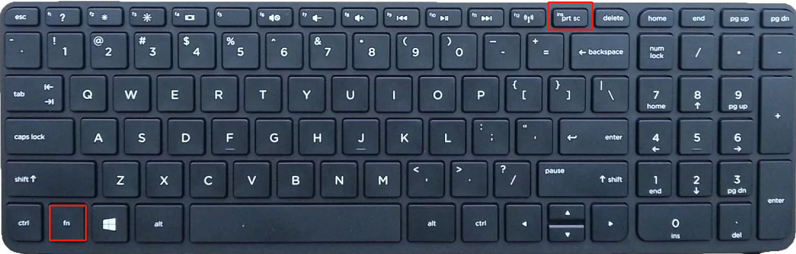
When taking a snapshot of a specific window, just press the “Fn”, “Shift”, and “Print Screen” buttons at the same time.
#2. Using the Snipping Tool
A built-in tool on your PC such as the Snipping Tool can also aid in the process of how to screenshot on a Windows 60 keyboard.
- Search for the “Snipping Tool” program via the “Start” menu and launch it. Alternatively, the “Windows + Shift + S” key combination can be pressed.
- Tap the “New” menu to snip a new image.
- Using your mouse, select the area or region you like to snip.
- Once done, you should see the image captured on the Snipping Tool window. To export it, press the “File” button and then click “Save”. Basic editing buttons are also available in case needed.

#3. Using the Game Bar
Another built-in tool, the Game Bar, could also be helpful in the process of how to screenshot on a Windows 60 keyboard. This can be used when taking snapshots and even when screen recording. If you wish to try using it, here is the step-by-step guide that you must follow.
- Launch the Game Bar by pressing the “Windows” and “G” keys at the same time.
- On the “Widget” menu, you’ll see the “Capture” button. Press it to see a drop-down menu.
- Click the “Take Screenshot” option to finally be able to take a snapshot.
#4. Using a Browser Extension
A browser extension can also be an option to use in the process of how to screenshot on a Windows 60 keyboard. You have to choose your preferred browser extension and look for it on the Chrome Web Store. “GoFullPage” is a good example. One found, that you have to press the “Add to Chrome” menu and shortly, you’ll be able to use it when taking snapshots of your screen.

Tip: If you can’t find where the Print Screen button is on your keyboard, you can press this key combination - "Fn + Windows logo key + Space Bar" to take a screenshot.
Part 3. Best Way to Screenshot on Windows
Indeed, the methods of how to screenshot on a Windows 60 keyboard that was previously shared in the second part are all effective and easy to use. But just in case you’re wondering about the best way of taking screenshots on your Windows PC, you should then know more about the iMyMac Screen Recorder.
The abovementioned is a professional software app that is mainly designed to satisfy the users' needs when it comes to screen recording. But the good thing about this app is that it also has other added functions which include the “screenshot” feature. When capturing your screen, it is always best that you use a professional tool like this one. You can rest assured that you’ll get only the best output as well as the best app experience.
Get A Free Trial Now! Intel Mac M-Series Mac Get A Free Trial Now!
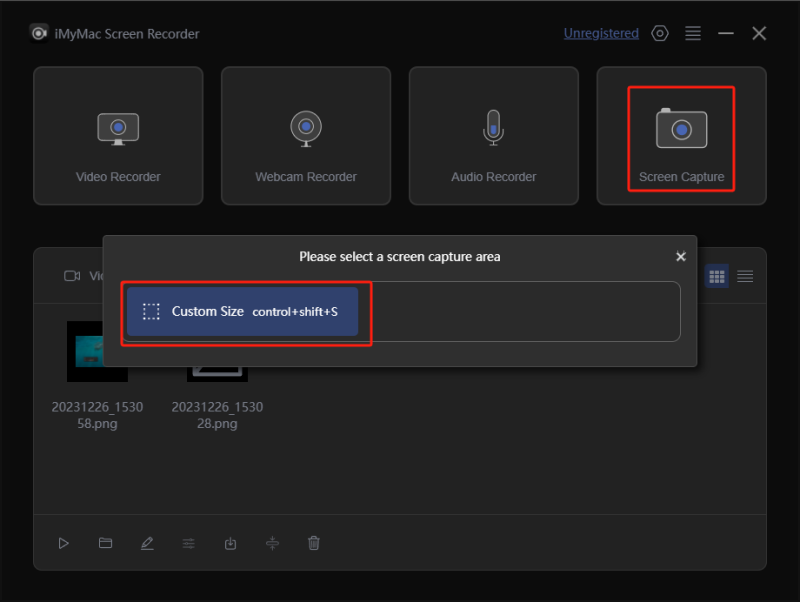
To screenshot using the iMyMac, here are the steps.
- Launch the app on your computer and press “Screen Capture”.
- Choose the area to capture by clicking “Custom Size”.
- Navigate to the area you wish to screenshot. You may use the editing tools if you wish to.
- To complete, hit the check mark.
You should see the image taken on your PC (saved automatically).
Part 4. Conclusion
In the process of how to screenshot on a Windows 60 keyboard, you can utilize free and built-in tools like the Game Bar, the Snipping Tool, some shortcut keys, or even browser extensions. However, if you’re on the lookout for the best method, it’s suggested that you rely on professional apps like the iMyMac Screen Recorder.
