


Capturing screenshots of your activities is totally helpful especially if you are eyeing to create tutorials, guides, presentation materials, or any other content. Explaining via images is much better and easier compared to using text. With the help mainly of the “Print Screen” button, taking a snapshot of one’s whole screen became too easy. But what if we want to capture partial screenshots on Windows computers? Are there shortcut keys available for this action as well? Or, are there available tools we can use? In this article, we will show you easy tips to do that.
Contents: Part 1. How Do I Enable Partial Screenshots with Shortcut Key?Part 2. How Do I Take a Screenshot of Only One Part of My Screen Windows?Part 3. Best Way to Take Partial Screenshots on Windows?Part 4. Conclusion
Part 1. How Do I Enable Partial Screenshots with Shortcut Key?
We’ll be starting with discussing how you can enable partial screenshots on Windows PCs by just using shortcut keys. It’s indeed a convenient method as this won’t require the installation of any other third-party tools. You can even select a form of your screenshot, either a rectangular or a free-form one. After getting the snip needed, it will automatically be copied to your clipboard. You can open another app like “Paint” to edit the image or just paste the screenshot.
- Hold the “Windows”, “Shift”, and “S” buttons.
- Decide on the area to capture.
- Paste the screenshot on any app you want to use to edit.
- Finally, save the image taken.

Part 2. How Do I Take a Screenshot of Only One Part of My Screen Windows?
Of course, apart from using the shortcut keys, there are also apps that you can utilize to capture partial screenshots on Windows PCs. Some of them will be enumerated in this section.
#1. Snipping Tool
Being a long-time user of Windows PCs, you might have surely heard or read about the Snipping Tool most of the time. It’s a built-in tool that you can use to capture partial screenshots on your computer with ease. It even offers basic editing functions. To use it, just simply follow the below guide.
- Launch the Snipping Tool program on your computer. Choose the “Mode” to use. Three options are available for you – “Rectangular”, “Window”, to “Free-form”.
- Press the “New” button.
- You can freely edit the screenshot taken. Tools like “Pen” and “Highlighter” are available.
- To proceed with saving, tap the “Save Snip” menu and browse an output folder to use. Name the file you wish.

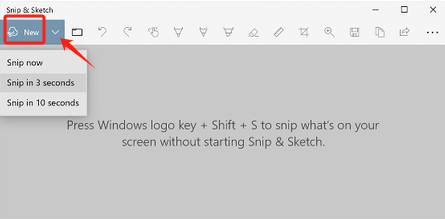
#2. Snip & Sketch
Apart from the Snipping Tool, there is another built-in program that can be used to capture partial screenshots on Windows PCs, the Snip & Sketch. It also has available basic editing menus that let the user draw or write on the snip. Cropping is also possible if needed.
If you want to try and use it, here are the steps that you should follow.
- Launch Snip & Sketch and tap the “New” button.
- Choose the desired area to snip.
- Perform editing or annotation on the image as preferred.
- Hit the “Save As” button and then select an output folder to use to save the screenshot captured.
#3. Game Bar
We’ve got another built-in tool to share with you – the Xbox Game Bar. Though mainly known by many as a program that’s dedicated to capturing gameplay, the Game Bar is also a handy tool that can assist with capturing screenshots.
To take partial screenshots on Windows PCs using the Xbox Game Bar, you may refer to the below tutorial.
- Open the Game Bar by either searching it up or pressing the “Windows” and “G” keys on your keyboard.
- Decide on the area to screenshot. When ready, hit the “Camera” icon. Alternatively, you may hold the “Windows”, “Alt”, and “Print Screen” keys at the same time. This shall let you capture an image and save it right after.

All images taken can be seen in the “Captures” folder.
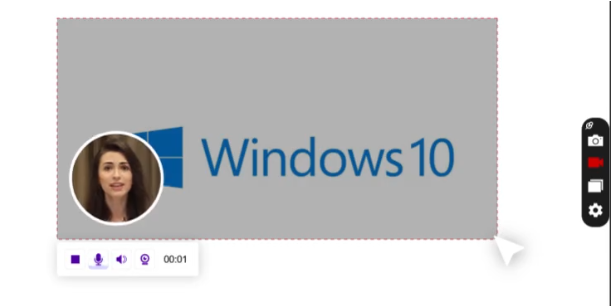
#4. ScreenRec
Apart from built-in programs on Windows PCs, there are also free apps that can assist when taking partial screenshots on Windows PCs. A good example would be ScreenRec. In fact, aside from capturing screenshots, this app can also help with screen and audio recording.
If you wish to give this tool a shot, here’s what you need to do.
- Open the app and hit the “Alt + S” key combination.
- Bring the frame to the section to capture and then hit the “camera” icon.
- Perform annotation as wished.
- Save the screenshot taken via the button that you’ll see on the lower area of the window. Getting a shareable link or copying the image to the clipboard is possible as well.
Part 3. Best Way to Take Partial Screenshots on Windows?
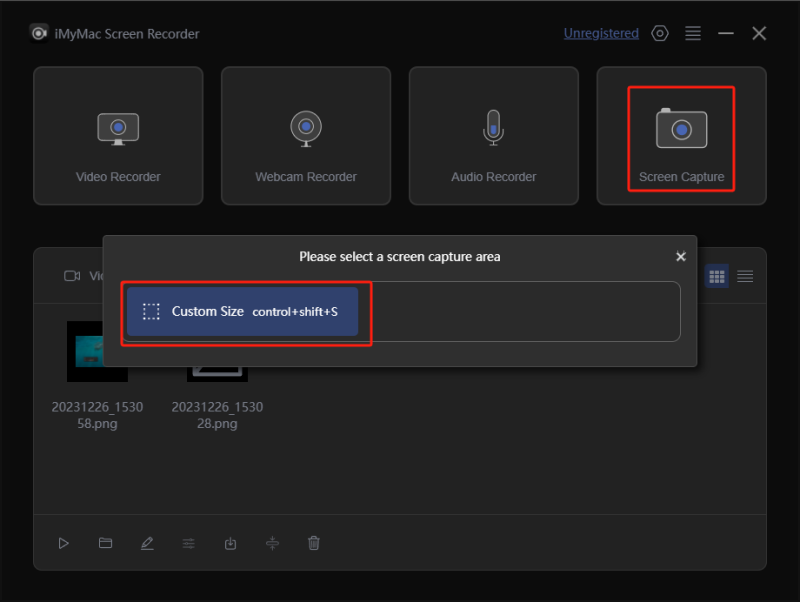
Though good enough, you might still find some limitations and drawbacks when the tools shared in the previous sections are used while taking partial screenshots on Windows PCs. That is because they are free. If you wish to have a more advanced experience when capturing screenshots and several other functions, it’s best to try and check some professional software applications out there. Well, a good example will be the iMyMac Screen Recorder.
Though known as the best when it comes to screen, webcam, and audio recording, you should also be aware that it also is a master when it comes to capturing snapshots. It ensures that users will get high-quality output files and promotes easy navigation since its UI is simple and intuitive.
Get A Free Trial Now! Normal Mac M-Series Mac Get A Free Trial Now!
To use the iMyMac when capturing partial screenshots on Windows computers, here are the steps.
- Choose the “Screen Capture” menu upon launching the app.
- Press the “Custom Size” option to specify the area to screenshot.
- Move to the area to capture. Use the editing menus if needed.
- When done, hit the check mark to finish off. Automatically, the image will be saved to your PC!
Part 4. Conclusion
To take partial screenshots on Windows computers, you have plenty of options to choose from. Using shortcut keys should work as well as utilizing built-in tools or freeware. But if you are aiming to perform more advanced editing and annotations, to get the best experience, the use of professional apps like the iMyMac Screen Recorder is recommended.
