


Sims 4 is a beautiful and fantast-created game targeting users of different ages. Playing it immerses one in the app’s intuitive and attractive interface and design. The sceneries in the game would make one want to capture Sims 4 screenshots to record beautiful houses and lawns. But is taking snapshots while gaming easy to do?
You should be aware that there are multiple methods of how you can do that! We will tackle each of those as we go further into the body of this article.
Contents: Part 1. How to Take Pictures in Sims 4?Part 2. How to Take a Screenshot of Sims 4 on Windows?Part 3. How to Take Screenshots on Sims 4 on Mac?FAQs about Screenshots on Sims 4
Part 1. How to Take Pictures in Sims 4?
If you are not into installing apps on your device, taking advantage of the built-in tools on Sims 4 could be a good option for you when taking Sims 4 screenshots. Two of them will be shared in this section – the UI Board and the “C” key on your keyboard.
#1. Using the UI Board
While playing the Sims 4, surely, you might have noticed functions on your screen. The control board, which is located at the bottom area is what we need here. It is responsible for allowing controlling time, viewing modes, as well as taking screenshots. Look for the camera icon from the UI Board. Press it to finally capture Sims 4 screenshots whenever you want to.
#2. Using the “C” Key
Another option to capture Sims 4 screenshots is by utilizing the “C” key on your keyboard. In Sims 4, this key is known as the “print screen key”. It can capture your screen in full in static.
If you’re wondering where you can see the images taken from the game, you can see them under the “Screenshots” folder in the “The Sims 4” folder from the “Electronic Arts” folder on your “Documents” tab.

Part 2. How to Take a Screenshot of Sims 4 on Windows?
Apart from the built-in screenshot tools that can be accessed from the Sims 4 game itself, there are ways for you to take Sims 4 screenshots.
#1. Using Your Keyboard
Remember that your keyboard still has the “Print Screen” key. You can use this anytime you want even when playing the Sims 4. If you wish to take a full-screen snapshot, press the “Windows” and “Print Screen” keys. To capture only an area or a window, hold the “Alt” and “Print Screen” keys together. You may capture a customized size as well by pressing the “Windows”, “Shift”, and “S” buttons at the same time.
#2. Using the Snipping Tool
Another built-in tool Windows PC program that can be used when taking Sims 4 screenshots is the Snipping Tool. To launch it, just search for it via the “Start” menu. Once opened, press the “Mode” button after clicking “New”, and then select your preferred mode to use. Via your mouse, take the screenshot as you like.
Once you have the image, you can either save it directly right away or copy it and paste it into another app like the “Paint” app to edit it if needed.

#3. Snip & Sketch
Snip & Sketch works the same with Snipping Tool. If you prefer not to use the previous one, you can try this out.
You can just simply search this program from your PC. Upon launching it, press the “New” menu, and then select the type of screenshot that you wish to take. You can edit the generated image or just save it afterward.
Part 3. How to Take Screenshots on Sims 4 on Mac?
Upon sharing with you the easy methods of taking Sims 4 screenshots on a Windows PC, it would also be great to learn the same if you are to use a Mac computer.
Use the Shortcut Keys
On your Mac, you can just simply utilize some shortcut keys to capture screenshots. Here’s how it works so you can test it out yourself as well.
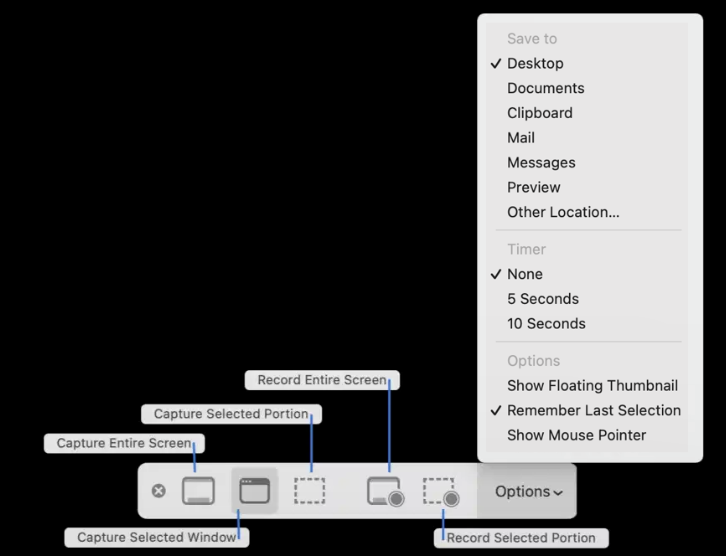
- Hold the “Shift”, “Command”, and “5” keys on your keyboard. Options will be shown – capture the entire screen, a selected window, or select a portion. Choose which way you prefer.
- Upon choosing, press “Enter”. Select “Capture” next.
Once you’re done with the above, the images captured will be displayed on your desktop.
Easiest Way to Get Sims 4 Screenshots on both Mac and Windows
For your added information, there is another easy method of how you can get these screenshots that you want on your Windows or Mac. Not only while playing Sims 4, but when capturing anything on your screen when needed.
Professional software applications like the iMyMac Screen Recorder are effective when doing the above. Apart from taking screenshots, this can be utilized to record one’s screen activities. Capturing the webcam and audio is even possible. As previously mentioned, you should be able to use this regardless if you have a Mac or a Windows computer as this is compatible with both! Its simple interface makes it amazing to use!
Get A Free Trial Now! Normal Mac M-Series Mac Get A Free Trial Now!
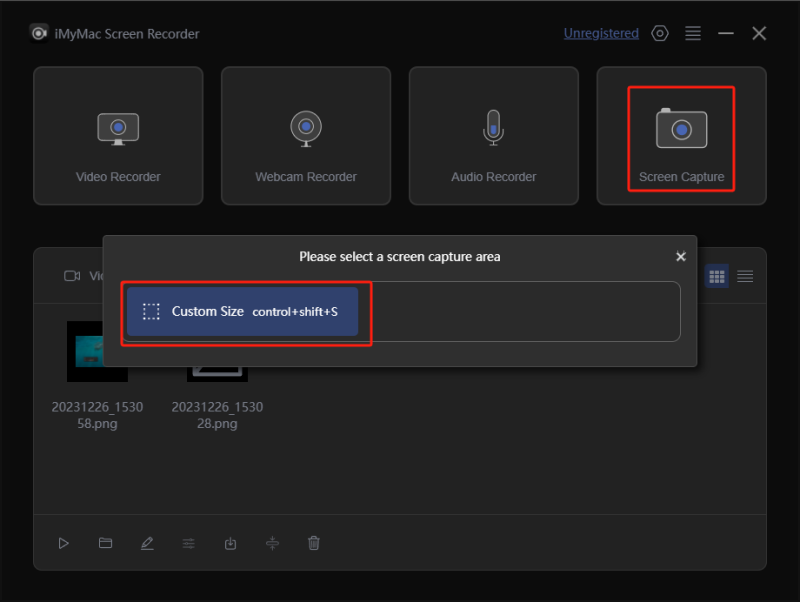
Here's a quick overview of how you can take Sims 4 screenshots using this tool.
- Once installed, press the “Screen Capture” menu.
- Press “Custom Size” to choose an area to be captured.
- Finally, move your cursor to the section you like to screenshot. You may use the editing menus if you wish to.
- To end, tap the check mark. You should see the generated image on your PC afterward.
FAQs about Screenshots on Sims 4
- Where do I find my Sims 4 screenshots?
You should see the Sims 4 screenshots in this location - \My Documents\Electronic Arts\The Sims 4\Screenshots – if you are to use the Sims 4 built-in screenshot tools.
- What is the command Shift C screenshot in Sims 4?
The command shift C key combination is supposed to open the testing cheats bar on Sims 4 but when pressed, one would generate a screenshot.
- How do you open the Screenshot Manager in Sims 4?
The Screenshot Manager can be accessed via the “Camera Controls”.
