


“How do I take a Zoom screenshot on my computer? Is there a free and built-in tool that I can use? Or, will it be better to check out some apps out there?”
Ever since the news about COVID-19 broke, the response of most people was to take and accomplish everything online as much as possible – schooling, working, and more, making online platforms like Microsoft Teams, Google Meet, and, of course, Zoom most utilized. Nowadays, people no longer need to attend in-person calls or meetings as well as conferences because they can just dial in and attend using their devices. If you have been attending Zoom sessions, specifically, this article’s main topic would benefit you a lot.
Contents: Part 1. Can You Take a Screenshot on Zoom with Its Built-in Tool?Part 2. How to Take a Zoom Screenshot on Windows?Part 3. How to Take a Zoom Screenshot on Mac?Part 4. Best and Quickest Way to Take a Zoom Screenshot on Mac/WindowsFAQs about Zoom Screenshot
Part 1. Can You Take a Screenshot on Zoom with Its Built-in Tool?
Luckily, Zoom has a built-in tool that can be used by anyone to capture Zoom screenshots. However, this is switched off as per default and to be used, it needs to be enabled first via the “Settings” menu. Once turned on, follow the below tutorial to capture the screenshots needed.
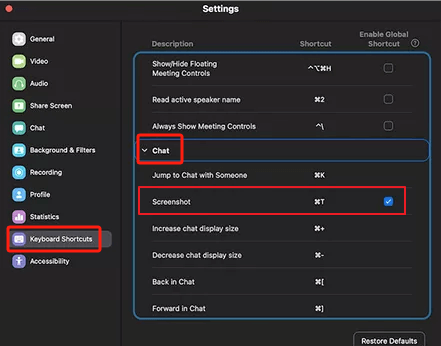
- Once opened, go to Zoom’s “Home” tab. Under your profile picture, press the cogwheel sign.
- Head to “Keyboard Shortcuts”. Ensure to expand the “Chat” settings next.
- From the drop-down menu, switch on “Screenshot”.
- If you’re using a Mac, additional Zoom permissions would be asked before you can use this built-in function.
Part 2. How to Take a Zoom Screenshot on Windows?
When taking a Zoom screenshot on your Windows PC, you have two available options – to use keyboard shortcuts or utilize free tools like the Snipping Tool.
Method #1. Using Keyboard Shortcuts
If you need to snapshot your screen during a Zoom session, you can try using hotkeys. You just have to be familiar with what buttons to press.
- Open your Zoom app and join the call.
- When you’re ready to take a screenshot, click the “Windows” and “Print Screen” keys on your keyboard. The Zoom screenshot should be copied to your PC’s clipboard which you can paste to a “Paint” app to save or edit if you wish.
Method #2. Using the Snipping Tool
A free and built-in app like the “Snipping Tool” can also be used to capture Zoom screenshots. If you wish to utilize this instead, follow the below tutorial.
- Run the Snipping Tool program (by searching from the “Start” menu).
- Choose the snip you wish to take by pressing “Mode”.
- Press “New” afterward (or hold the “Windows” + “Shift” + “S” keys).
- Click “File” then select “Save As” to keep the screenshot taken.

Part 3. How to Take a Zoom Screenshot on Mac?
Of course, we will also share a guide to take Zoom screenshots using your Mac.
In the same case as Windows computers, Mac devices also have a built-in tool that one can use when capturing screenshots. Using it, a user can capture his whole screen, a part of it, or an active window.
Here’s the easy and detailed tutorial for your reference.
- Open the Zoom program and attend a meeting. On your keyboard, press “Command” + “Shift” + “4” keys.
- Click the “Space” button when you see that the cursor has changed to a crosshair.
- Just click on the Zoom window to finally capture a screenshot.
Part 4. Best and Quickest Way to Take a Zoom Screenshot on Mac/Windows
It is totally simple and easy to take Zoom screenshots on your computer as there are free built-in tools and even a Zoom function that you can take advantage of. However, if you are still on the lookout for an alternative, the best and quickest way would be to rely on a professional software app like the iMyMac Screen Recorder when taking screenshots.
The abovementioned was mainly designed to assist users when it comes to screen recording. But since it was loaded with numerous functions, it is also capable of capturing screenshots. One can use the editing menus on this app to further improve his output as well as the real-time annotation tools. Given that it has a friendly interface, it will surely be suited even to beginners.
Installing this program won’t be an issue as well as it’s compatible with both Windows and Mac OS. To finally take a Zoom screenshot using it, here’s what you need to do.
Get A Free Trial Now! Intel Mac M-Series Mac Get A Free Trial Now!
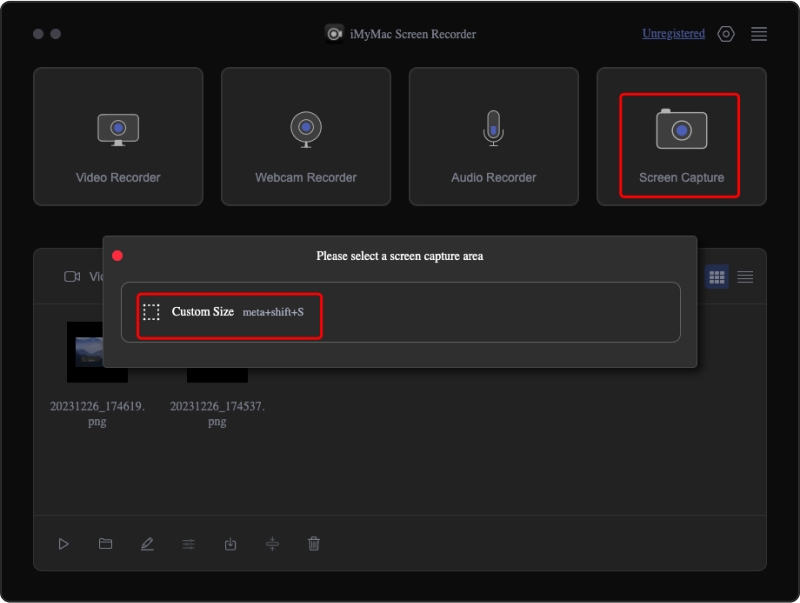
- Upon installing the iMyMac Screen Recorder on your computer, open it. From the main interface, locate the “Screen Capture” menu and press it.
- To choose the area to be captured, select “Custom Size”.
- Move your cursor to the desired area to snapshot. Once taken, you may check the available editing functions and use them as you wish.
- To finish off, press the check mark. Automatically, the image will be saved to your computer.
As simple as following the above, you can capture any screenshot that you need.
FAQs about Zoom Screenshot
We have also added a section in this article for some FAQs relating to taking Zoom screenshots.
- Can you tell if someone screenshots your Zoom?
Zoom has no feature that would let the users know if someone is taking a screenshot during the call. Thus, no notifications are sent when screenshots are captured.
- Where do Zoom screenshots get saved?
If you are to use the built-in screenshot function on Zoom, you should be able to see the images under the “Zoom” folder on “Document”. If you are to use other tools, you can set up the location where you want the outputs to be saved.
- Can Zoom disable screenshots?
Taking screenshots can’t be disabled on Zoom as there isn’t an available menu for such.
- What is the screen capture mode in Zoom?
The screen capture mode in Zoom is a method that’s being used to capture one’s screen for sharing.
